
For a while there I had a project finished every Friday, and really enjoyed the regularity. Then, for a while there [read: Christmas] I did not have a project finish very often.
Now I'm back in the swing of things with something to share! This has a happy and sad factor to it.
Happy: I made my first article of clothing, used my first pattern, and I love it!
Sad: It is a smiiiidge too small
So I'm here to tell you the tale of the Schoolhouse Tunic.
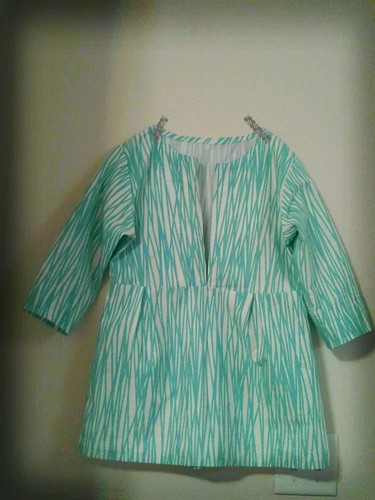
If you'll remember, I had posted a picture in this post of some blue challis that I was going to use for this project. Well, I really did like the fabric a lot. And then I was looking at this 2 yd piece of Khristian Howell fabric by Anthology that I had gotten for about $5 a yard. And that was better than the $20 I paid for the challis [which I then returned]. But the pattern says that the tunic requires 2 and 7/8 yd and the shirt version requires 2 and 3/8. So I dutifully laid out my pattern pieces and was playing around. If you all aren't familiar this particular fabric, the teal lines actually run horizontal from selvage to selvage. Well, I'm a small person, but even I didn't want horizontal stripes, so I laid the fabric end to end instead of selvage to selvage. And my pattern pieces, at a 2/4 size, fit just perfectly. Or rather, the shirt version fit just perfectly. I wouldn't have been able to make the tunic length. Really, I would have needed less fabric if I had wanted a certain directionality to my print.

I cut my pattern pieces from an old pattern that had large blocks of open space, so I just tried to trace in those areas as much as possible, and using a red marker so I'd be able to see it better. I thought that tracing and cutting out the pattern pieces was the worst part of the entire process!
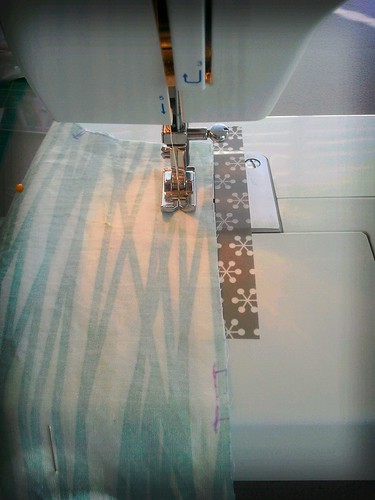
I used some washi tape to mark off 5/8" on my machine for the required seam allowance, and I zig-zagged all my seams.
 |
| ETA: Got a better picture taken! |
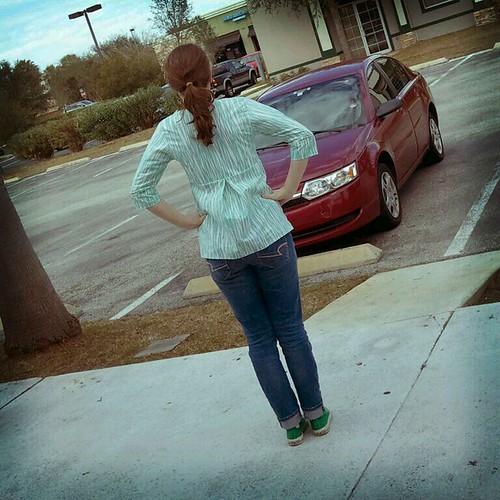
I finished my shirt last night around 10 pm. It's hard to tell in the photo, but it's too tight in the chest area. I can't raise my arms with comfort. And I'm actually wearing a sports bra in this photo so that I wouldn't have to add the bulk of a tank top under the shirt, and in an attempt to see if squishing everything down would allow me to be able to wear it [can you say desperate?].
SO SAD.
I can't even bring myself to put it on again for better pictures in the daylight outside, even though the shirt totally deserves a nice picture.
Things I learned during this process:
- This pattern is not difficult. Someone who has never worked from a pattern nor sewn clothing can definitely do this.
- That being said, some of the directions were not accurate to my situation. For instance, the sleeves are supposed to be gathered at the shoulder, but mine were the perfect size the fit the sleeves to the bodice.
- Do your research ahead of time. Because I browsed the Interwebz about this pattern, I already knew that some people had encountered the same sleeve situation.
- Try your garment on periodically through the process. [I did actually do this, I just didn't know that the chest would be too tight until after the top piece of the bodice was sewn to the skirt part of the tunic]
- Visualize what you want before you start each step. This sounds really weird, I know, but would have been totally helpful for me during several steps. I knew that I didn't want to put elastic in the sleeves, but it would have been much easier for me to hem a sleeve once it was connected to the shoulder, and THEN sew right sides together to actually make the sleeve. I didn't figure that out until after I had already sewn one sleeve, and had the raw edges at the wrists. That helped me when it came to hemming the shirt before I sewed the final pieces together.
- Cut your pattern pieces ACCURATELY. I was trying, really, but pattern paper is really flimsy, and not conducive to being super precise. It all worked out in the end.

 |
| Hem line |
 |
| I cuffed the sleeves quite a bit so they fall just past the elbow instead of to my wrists |
Questions I have from this process: [this is where my lack of clothing-making shows]
- If I use a fabric with more give for my next try [ie, a linen-cotton blend, or a blend of some other sort] instead of a cotton, will it make the shirt stretchier for it to fit me? The 2/4 size was just a smidge small on top; the next size up will be too big I'm afraid.
- Along the same lines of fit, would I be able to make the bodice a size up, but keep the bottom half of the shirt the same 2/4 size? Or will the pattern pieces not fit together correctly?
- If none of those options are legitimate clothing-making choices, then how do I adjust the pattern to allow for more room in the chest?
- How do I put elastic under the bust line where the 2 parts of the pattern are joined, in order to make the shirt easier to put on?
Regardless of the outcome [ok, yes, I am devastated still, but I'll survive] I'm proud to have already accomplished one of my 2012 sewing goals [making clothing] and found it very satisfying to complete.
Thanks for reading through all this! I'd recommend the Schoolhouse Tunic to anyone, and hope this helps some other people in their attempts. And if anyone wants to answer my questions, feel free!
I have learned to make a "sloper" or a muslin (or ugly fabric) trial of the pattern. Then I can make adjustments to the pattern pieces itself, before actually cutting into the expensive fabric. I used to love making garments, now I rarely make any. Finding patterns and fabric for garment sewing has become such a challenge through the years, it seems.
ReplyDeleteI agree with Quilts by Jo C.! I have been sewing for many years and don't even try to make clothes for myself because of patterns and fabric difficulties.
DeleteMay I make a suggestion to the Schoolhouse Tunic problem?
IF you have a 2" width of fabric double the length of the underarm to hem seam(you know, one for each side), you could open up each underarm to hem seam and insert it, with full width at the hem and down to nothing at the sleeve seam. Sort of like adding in a box pleat at each side seam.
Doing this to each side would add in 2" of 'breathing room' at the sides. It is possible to pick seams out and redo them. It may seem hard at first, but in the end you will be able to wear the Schoolhouse Tunic easily, so it would be worth it.
Well first off, you did a great job. It's an adorable top! I can feel your pain, though, as I've had similar problems in tailoring clothing patterns to fit just right. I will definitely try Jo's idea (above) the next time I make an attempt at anything more detailed than flannel pajama pants! lol Congrats on meeting that goal so quickly. You're doing great!
ReplyDeleteYou did a great job on this tunic. All is not lost though. Just take out the side seams (all the way down,) and take out the seams on the length of the sleeves. You only need to use a very small zig-zag stitch on knits, and a straight stitch on everything else. Now, where you did have 5/8" seam allowance, use 1/4" seam allowance ... this will give you an additional 1-1/2" all around the bust area and all the way down (which is okay, tunics are supposed to fit loose.) On the sleeve seams, start out with the 1/4" seam allowance and taper it down to a 5/8" seam allowance on the elbow area. Good luck. I've been sewing since I was a little girl, so if you need any help just e-mail me at tsladovnik@gmail.com.
ReplyDeleteI had the EXACT same experience sewing this pattern! It's my first real garment and I'm EXACTLY bummed out like you. How funny is that? I appreciate this idea of expanding the side seams. I'll look into it. I probably need to learn how to do a "full bust adjustment" on patterns because I'm bigger than the standard B-cup they're designed for. I think I'll have this problem repeatedly if I don't learn this technique. Sigh...
ReplyDeleteit LOOKS great! i'm sorry that it doesn't fit better. hope you can try the suggestions above and fix it. because it looks great on you!
ReplyDeletethanks so much for linking up to finish it up Friday!
Did you end up fixinng the seams to make it bigger on this one? I love the fabric!
ReplyDelete