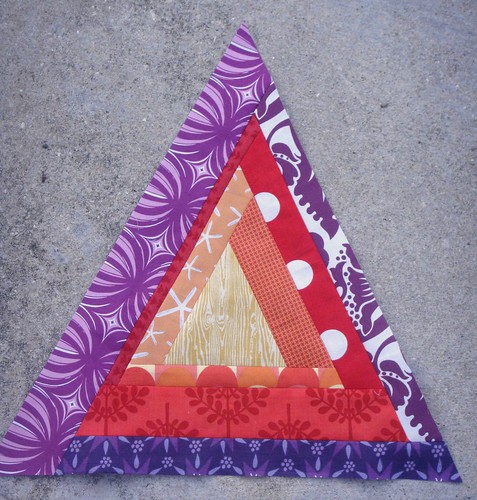
As I mentioned in yesterday's post, I decided on triangle log cabins in warm colors of reds, yellows, oranges, and purples for my brand-spankin'-new bee participation.
I figured the blog was the best/easiest platform for the instructions to my fellow bee ladies, many of who are in Canada [I love when they talk about Robin being Canadian in How I Met Your Mother. Watch this clip. Also, I have no ill will towards Canada, lol]. So because of that, I need to ship out my fabrics soon!
I am sure that there are oodles of ways to put these together, but this is my method, and if everyone follows it then the triangles should be consistent. Yay! And hey, if anyone else wants to make them, now you'll know how!
The center triangle will be made from a charm square. There will be one in every package.
To make the triangle line up the ruler at 2.5 inches at the top of the triangle, and down through the bottom corner. Cut.
Repeat with the other side.
This is what it should look like when you are done. I chose this method because it is the simplest way that I could think of to create an isosceles triangle.
[The triangle changed because the Ruby triangle is being used in another project]. Take the first fabric you want in your log cabin and lay it next to the triangle. You will note my ruler placement. The strip of orange fabric must be staggered with the triangle enough so that when the ruler is laid across that left edge there will be orange fabric to trim. You will have to do this every time you add fabric to the triangle.
Sew, making sure to backstitch when you get to the triangle, even if you start sewing at the end of the strip. Press your seams open.
Trim the strip on both sides so that the edges are flush with the original triangle.
It will conveniently also trim the dog ears at the same time.
This is what you end up with. A bigger triangle! This is the time to trim down the added strip if you want it to be narrower. Once you add additional fabrics you lose the opportunity, so if I had thought this was too wide I would have simply laid my ruler over top, using the seam line of the two fabrics as a guide to stay even, and trimmed to the desired width.
Keep adding pieces to the sides, just like a regular log cabin block. This is after I had added one piece to all sides. You use the exact same method each time.
As you can see in this picture, at the top of the red strip you will notice that it is angled, and then flattens out. I can still use the red strip, but I had to trim this down because the shape of the strip did not allow me to follow the line of the left side of the triangle when I went to trim.
Add as much fabric as you'd like [bee members, I give final measurements below]. It is important to sew accurately so you don't end up with a wavy/wonky triangle. And voila, now you have a beautiful triangle log cabin!
Ladies in the bee:
-Finished triangle size should be 15.5" across the bottom and 15.5" from the tip to the bottom.
-As you can see in my example, I don't want the widths of the pieces to be equal the entire time. I ask that you do not use any piece wider than 2.5" finished.
-Feel free to break each strip up into multiple fabrics. To do that you would just sew lengths together to form strips and then follow the instructions above.
-As far as color goes, in my example I did light to dark, but you can do whatever you want. You can use all the same color in each successive go-round, or you can be super scrappy. Whatevs!-I'd like at least 3 additional rows around each triangle, just like my example.
Most of all, have fun! :) Holler if you have questions! That goes for anyone, not just bee members.


Oooh I'm getting good ideas from these! Thanks for the tutorial :)
ReplyDeleteThanks for the tutorial these look fun to make =D
ReplyDelete"isosceles"-look at you with your fancy college words!! lol
ReplyDeleteTo make that triangle you can also fold your fabric in half, then trim corner to corner, then you only have to cut once and you don't have to measure.
I really love these blocks, I might have to try to make some sometime!
Great instructions, I can't wait to get started!
ReplyDeleteSaw this on Crafting...'s blog - very fun!
ReplyDeletethis is a great post.. thank you!
ReplyDeleteThanks for sharing your tutorial. I have linked to you over at Freebies for Crafters blog.
ReplyDeleteKind Regards, Khris
Another must have, Thank you
ReplyDelete