Hello again all! I'm back again with the 2nd Christmas in July tutorial of the day! Make sure you go check out
Jessica's quilted holiday card tutorial with a giveaway if you didn't see it earlier!
So this was my day during Christmas in July and I wanted to make sure that there was something that was festive and holiday-esque, but not necessarily "Christmas". I want everyone to play along, regardless of whether you celebrate Christmas or have an aversion to Christmas decorations! I had originally planned for this to be a pillow, but then when I had the giveaway a few weeks ago, so many people said they wanted to make table runners or wall hangings. I'm a people pleaser, so I made it happen!
This is a paper piecing pattern that I created in EQ5. The paper piecing template can be found
HERE. In downloading the pattern you agree that you will only use the pattern for personal use. You cannot sell the pattern, or items created from the pattern, without express written permission from me, Rebecca Smith.
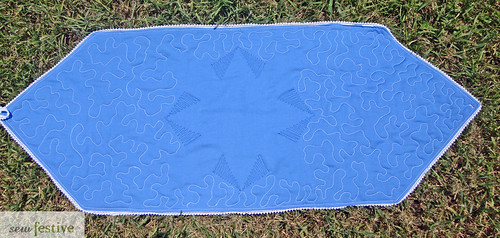
Snowflake Table Runner/Wall Hanging
Please read through entire instructions before beginning.
Materials Needed:
**Fabric amounts listed are for the same placement of different fabrics as my example; your amounts may vary, depending on where you choose to put which fabrics.
- Four copies of the paper piecing template
- Coloring page [optional, but recommended] found HERE
- FQ - 1/3 yd of 3 different fabrics [you will have scraps left over]
- 1/2 yd background fabric [you will have scraps left over]
- 18"x38" piece of batting
- 1/2 yd backing fabric
- 3 yds pom pom trim [optional; if you choose this then you don't need the ribbon]
- Scrap of coordinating ribbon/twine [approximately 4 in long]
- Scissors for cutting paper
- Old rotary cutter [optional]
- Tweezers [optional]
- Usual quilting supplies [ie, scissors, cutting mat, ruler, etc]
*Disclaimer: I am by no means a paper piecing expert. In fact, this was the first paper piecing I've ever done [I know, right? What have I been doing with my life?]. This means two things. 1, I have tried my hardest to explain thoroughly, but this may not be the "right" way to paper piece, and 2, you can clearly do this if you've never paper pieced before, because I did! If my instructions don't work for you [we all have different learning types!] then please, take a whirl around the Internet and find some other tutorials that might click with you, and use their methods for piecing the snowflake.
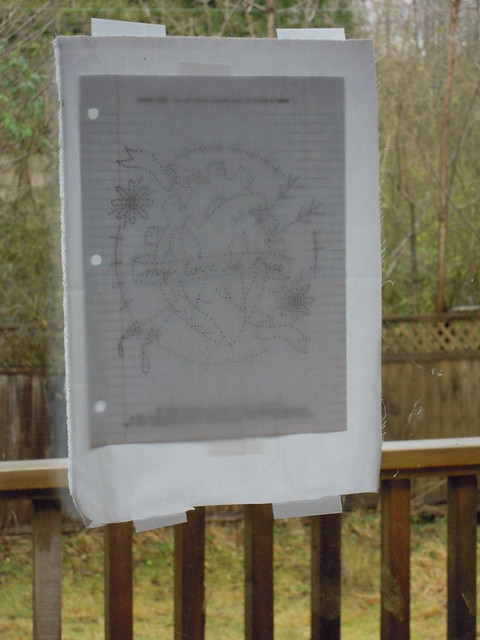
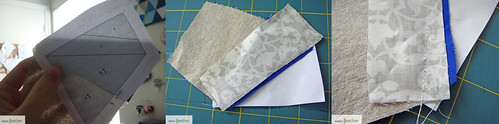
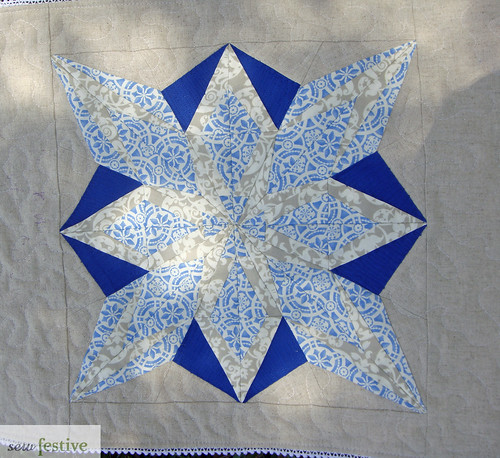
Step One - Color in your blocks
I recommend doing this so you can play with the placement of colors in the various pieces, and then you know which fabrics go where when piecing. Above you can see the various iterations I went through before I settled on a color scheme.
*Note, some of the lines got messed up between exporting from EQ5 to Paint to uploading to Google Docs. So there's a missing line on the right side of the top, bottom, left, and right diamonds on the coloring page. It should be pretty obvious, and is easy to just draw in.
Step Two - Print your Templates and Set your Machine
The snowflake is created using 4 blocks, and will finish at 12.5" square. Each block prints on one page, so print 4 copies. In the area where you can choose scaling, choose NONE. To ensure that the blocks printed at the correct size, please verify that Unit A measures 3.5" along the bottom.
*These are the printing instructions for viewing and printing through Adobe Reader. I recommend that you use this program. If you don't have it, you can get it for free here.
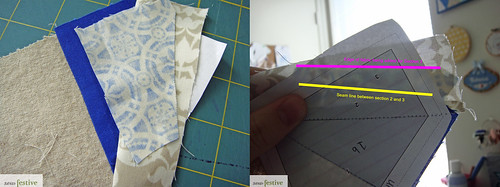
Please note that I have written in some different numbers in Unit A and Unit C because EQ5 didn't print one of the lines for some reason [you don't have to do anything, I was just explaining the hand-written numbers on the Google Docs copy]. Cut the templates apart, but do not cut directly on the line of each template. Keep templates grouped in blocks so they do not get mixed up.
Set your machine to a low stitch length. This perforates the paper and allows for easy tearing. It is important to backstitch at the beginning and end of each piece you stitch, or else your stitches will get ripped out when removing the paper. The needle you use will need to be replaced before quilting your project, because the paper dulls the needle more than usual sewing.
***Assume all seam allowances in pattern are 1/4" unless stated otherwise.
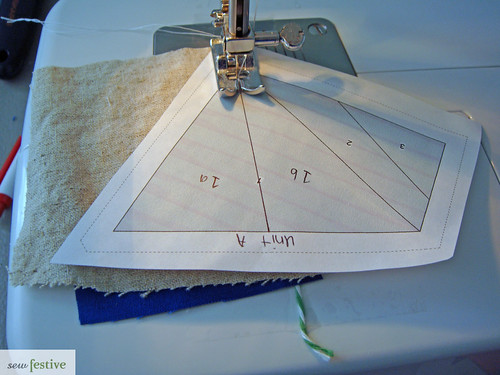
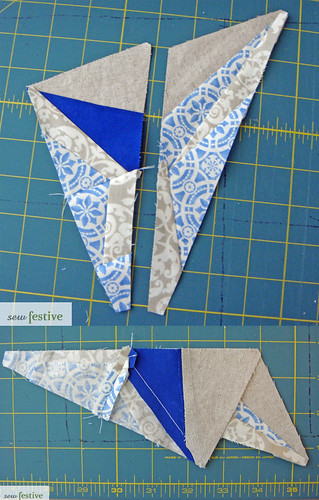
Step Three - Unit A
Take Unit A piece; set all others aside. The solid lines on the pattern indicate where you will be sewing. The pieces of fabric that you use must always be large enough for a quarter inch seam allowance, which is the portion of the pattern between the gray and the dotted line. I do not measure the pieces I use, I just start out with my FQs of fabric, and cut a square/rectangle that covers all the area that I need to cover. [Note: I personally use pretty large pieces of fabric because I'm less concerned about fabric waste than I am about not having a big enough piece of fabric. I assume that over time you will become more skilled at using the perfect amount of fabric. If you're really concerned you can print an extra paper piecing block and use the pieces to cut approximately 1/2" around them, thus minimizing fabric waste.]
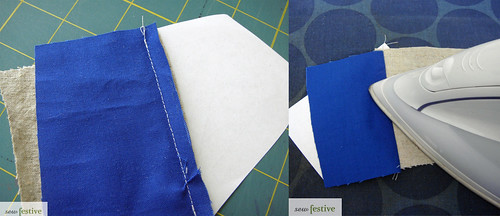
Take fabric piece that you will be using for section 1a and place it on the back side of the paper. The paper piece should always be numbers side up, while the fabric should always be right-side down. Essentially, the two pieces should be wrong side together.
Trim seam allowance to approximately 1/4" if necessary. Press open on fabric side.
Take fabric piece that you will be using for section 2 and place it right side together with the fabric that has already been sewn, with at least 1/4" seam allowance. Sew along the solid line between section 1b and section 2 and into the seam allowances on both sides.
TIP: To ensure that you don't sew the pieces on backwards, think about it this way - You will be adding the new fabric so that only the seam allowance shows up in the area of the section you're adding to. For instance, if sewing section 2 of Unit A, the white fabric I'm using should only extend into section 2 by 1/4"-1/2". That helped me when I was thinking about how to lay the new fabric down onto what I'd already sewn.
Trim seam allowance to approximately 1/4" if necessary. Press open on fabric side.
Take fabric piece that you will be using for section 3 and place it right side together with the fabric that has already been sewn. Sew along the solid line between section 2 and section 3 and into the seam allowances on each side.
Trim seam allowance to approximately 1/4" if necessary. Press open on fabric side.
Note: You do not want this to happen. It SUCKS to have to unpick tiny paper piecing stitching. If you're not sure about whether a piece of fabric will be big enough I'd recommend pinning it where it should go, and then finger pressing it back with a 1/4" seam allowance to make sure it goes all the way past the seam allowances.
You can now trim Unit A. You can certainly use scissors if you'd like [not your fabric scissors since you're going through paper!]. I personally like to use an old rotary cutter. Line the ruler up with the dotted edge and trim on all sides. Leave the paper on for now.
Step Four - Unit B/C/D
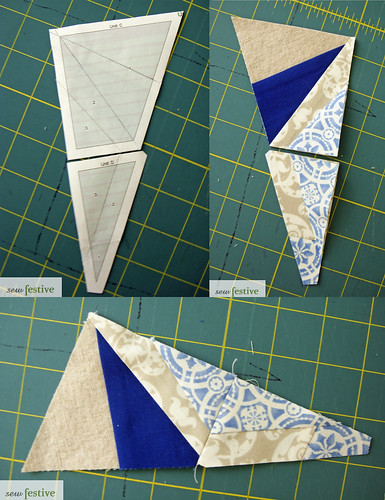
Follow the same paper piecing guidelines for Units B, C, and D. Units A and B are the mirror images of Units C and D, respectively.
Step Five - Unit E & F
Follow the same paper piecing guidelines for Units E and F. These are mirror images of each other.
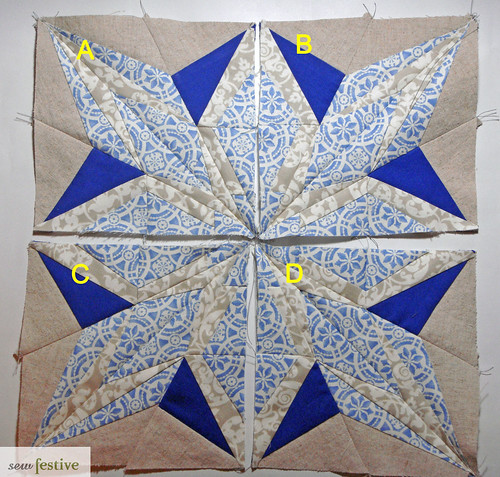
Step Six - Assembling the Block
Remove paper from Unit A and B, tearing gently. I use tweezers for any paper that gets stuck at the intersection of stitching lines if my fingers cannot remove it.
Sew Unit A and B together. Line the pieces up at the end that will become the center of the block. Press seam open.
Remove paper from Unit C and D Line the pieces up at the end that will become the center of the block. Sew together. Press seam open.
Sew Unit A/B to Unit E and sew Unit C/D to Unit F. Press all seam allowances open.
Sew Unit A/B/E to Unit C/D/F. Press seam allowance open.
Press block.
Step Seven - Make Three More Blocks
Follow steps 3-6 to create 3 more blocks.
Step Eight - Assembling the Snowflake
Sew block A to block B. Press seam open. Sew block C to block D. Press seam open. Sew top section to bottom section. Press seam open.
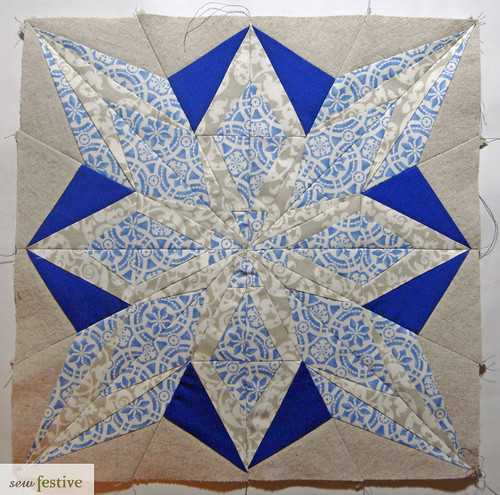
Awesome! You have a paper pieced snowflake block! You can stop here and use the block for whatever purpose, or you can read on to see how to make it into a table runner/wall hanging!
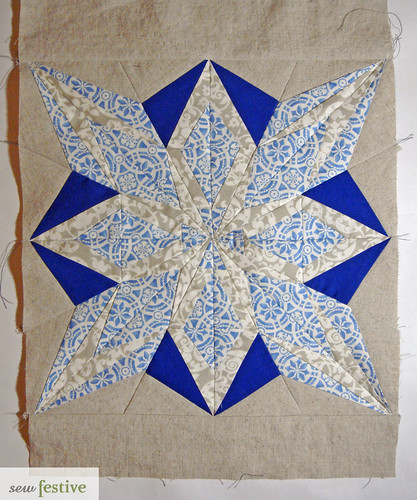
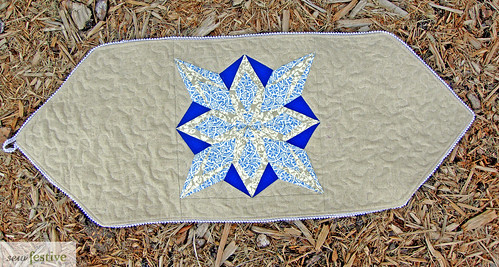
Step Nine - Assembling the Top
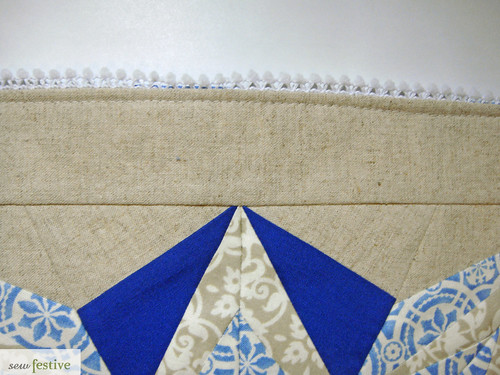
Cut two strips from background fabric that are 2.5"x12.5". Sew them to the top and bottom of the snowflake block. Press seams away from the snowflake.
Cut two pieces of background fabric that are 15"x16". Sew them to the left and right side of the snowflake block. You will be sewing along the 16" side. Press seams away from the snowflake.
Mark the left side at the 8" mark. Fold each side in to that mark so that the corners make right angles. Trim along the folded line [Save those triangles for another project!]. Repeat the same process on the right side.
Step Ten - Embellish
Baste top to batting, using preferred method. Trim batting to size of top.
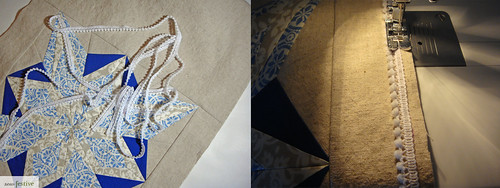
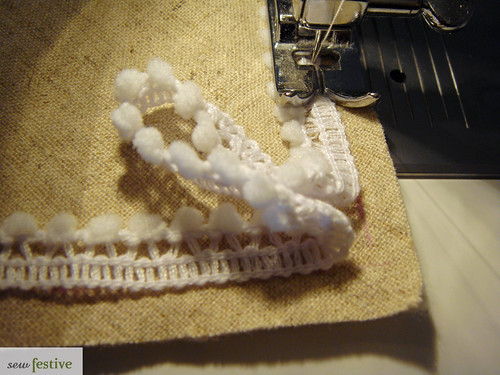
I chose to add tiny pom poms around the edge of my runner/wall hanging. I wasn't planning on it originally, but they were right next to me as I was sewing, and they're like tiny snowballs, right? If you don't want a trim then you can just skip these instructions!
Place your trim 1/4" from the edge of the top, with the pom poms facing in. Sew around the edge at just a hair past 1/4" so that you're catching just enough of the trim to secure it for the next step. Overlap the trim slightly when you get back to your starting point. There is NO backing on your project at this step, just the top and the batting.
To make a hanging loop, when you get to the point that will be the top, simply pull a little extra trim in towards the center and then continue following the edge. Backstitch a few times to give extra stability to the hanging loop.
*Note: Apparently these things melt under a really hot iron [ask me how I know], so take that into consideration.
Step Eleven - Assemble
Trim backing to exact size of top.
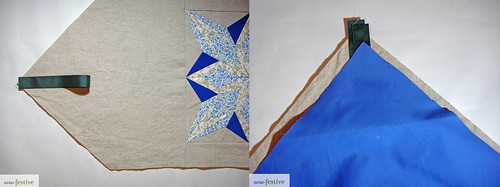
If you did not add a trim - Put ribbon ends at the end of your runner/wall hanging that you want to be the top. The ribbon should be facing in towards the center, with the ends sticking over the edge by at least 1/2". Secure with pins if necessary.
Lay backing right sides together with top. Your project should be layered as follows: backing, top, batting. Smooth the fabric out as much as possible [you want to prevent bubbles when you turn it] and pin! Stitch around the runner at just over a 1/4" seam allowance, leaving a few inches open to turn right-side-out. Backstitch several times over the ribbon ends for extra security.
Turn runner right-side-out, pressing out the top and bottom points. Press unstitched edges. Make sure there are no bubbles and top-stitch around the edges at 1/8".
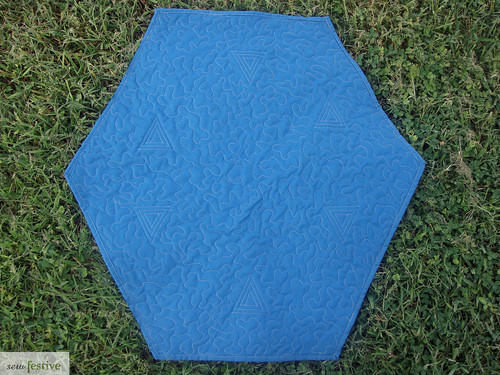
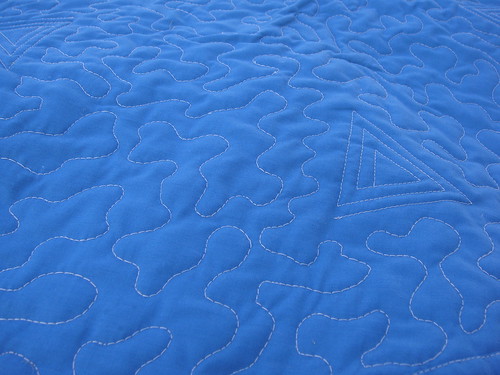
Step Twelve - Quilt as Desired
I opted for a large stipple in the negative space and some free-motion straight-ish lines in the solid blue, but you don't have to add quilting if you don't want to, especially if this is destined to hang on the wall.
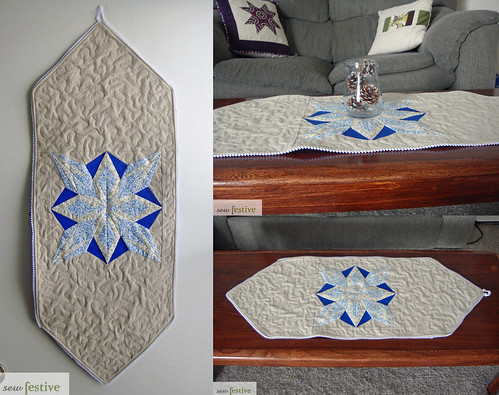
You did it! You have yourself a paper pieced snowflake table runner or wall hanging. The ribbon can just be tucked under if you'd like to use it on a table, and hung over a peg/tack/etc for hanging on the wall! Mine looks particularly smashing on my coffee table that I refinished myself ;)
I plan to hopefully add the words "I'm dreaming of a white Christmas" to my project if I find a stamp set that I like!
Phew! If you've made it this far, congrats! I hope that the instructions and photos are clear, and that you consider making one of these for yourself!
What? Not feeling the snowflake?
Look! You can make a poinsettia out of the same pattern! This is next on my list!
Please let me know if you have any questions! And what you think of the pattern. If you make something using the pattern, I'd love for you to email me a picture :)
Merry Christmas in July Day 1! Come back next Monday for more holiday tutorials! And remember, at the end of the month is a link-up where you can show your completed holiday prizes and get a chance at some prizes!