
There are some great tutorials out there on how to install an invisible zipper in a pillow. But those zippers are installed on a seam at the bottom or side of the pillow, and are sewn right sides together and then flipped right-side out.
But what if you like the look of binding on a pillow?
But what if you like the look of binding on a pillow?
Are your only options either an envelope closure or a lapped zipper [when the zipper is covered with a flap of fabric]?
No!
So in celebration of the weekend, I've prepared a little tutorial on how to
install an invisible zipper in a pillow cover. More specifically, in a
pillow cover that you also would like to have a binding.

Now, don't be scared. I know that zippers are terrifying for many quilters, and you may have to go slowly at first, but I promise you can do this! In fact, once you get the hang of it, it's so much faster than an envelope closure!

Materials needed:
- Invisible zipper [I almost exclusively buy 20-22" invisible zippers]; you do NOT need to shorten it to the size of your pillow
- Two pieces for your pillow backing - These need to be as wide as your pillow cover front, and then about an inch longer on each piece...for instance, for my 18" pillow I used a 12"x18" piece of Echo and an 8"x18" piece of light gray solid. [12+8=20...an extra inch on the top and bottom]. You can come up with your own measurements, just think about where you want your zipper to be on the pillow back, and go from there.
- Lightweight fusible interfacing [optional]
- Not pictured: Zipper foot - I use a regular zipper foot, but if you have an invisible zipper foot then by all means use it
- Pinking Shears [optional]
**Note: I apologize for the diagonal line of light across the photos; I was doing this as the sun was setting and no matter how I closed my blinds, it still peeked through.

1. I like to give my fabric a little extra support by fusing some interfacing to the edges where the zipper will be sewn. Zippers pull on the fabric a lot, and this can certainly help! If you choose to do this also, the interfacing should be 2-2.5" wide by the length of your fabric [18" in my case].

2. Iron your invisible zipper. The photo on the left shows the zipper right out of the packaging. The coils are turned under, which is the whole point of an invisible zipper. Using your fingers to help turn the coils to the front, iron the zipper flat. Make sure your iron isn't too hot, because the zipper coils can melt!
3. Decide which of your fabrics will be on top. In the photos, the Echo fabric will be on the top of the pillow backing. Rearrange your fabrics so that the piece that will be on top is on the right, and the other piece is on the left. The fabrics should be right-side up.

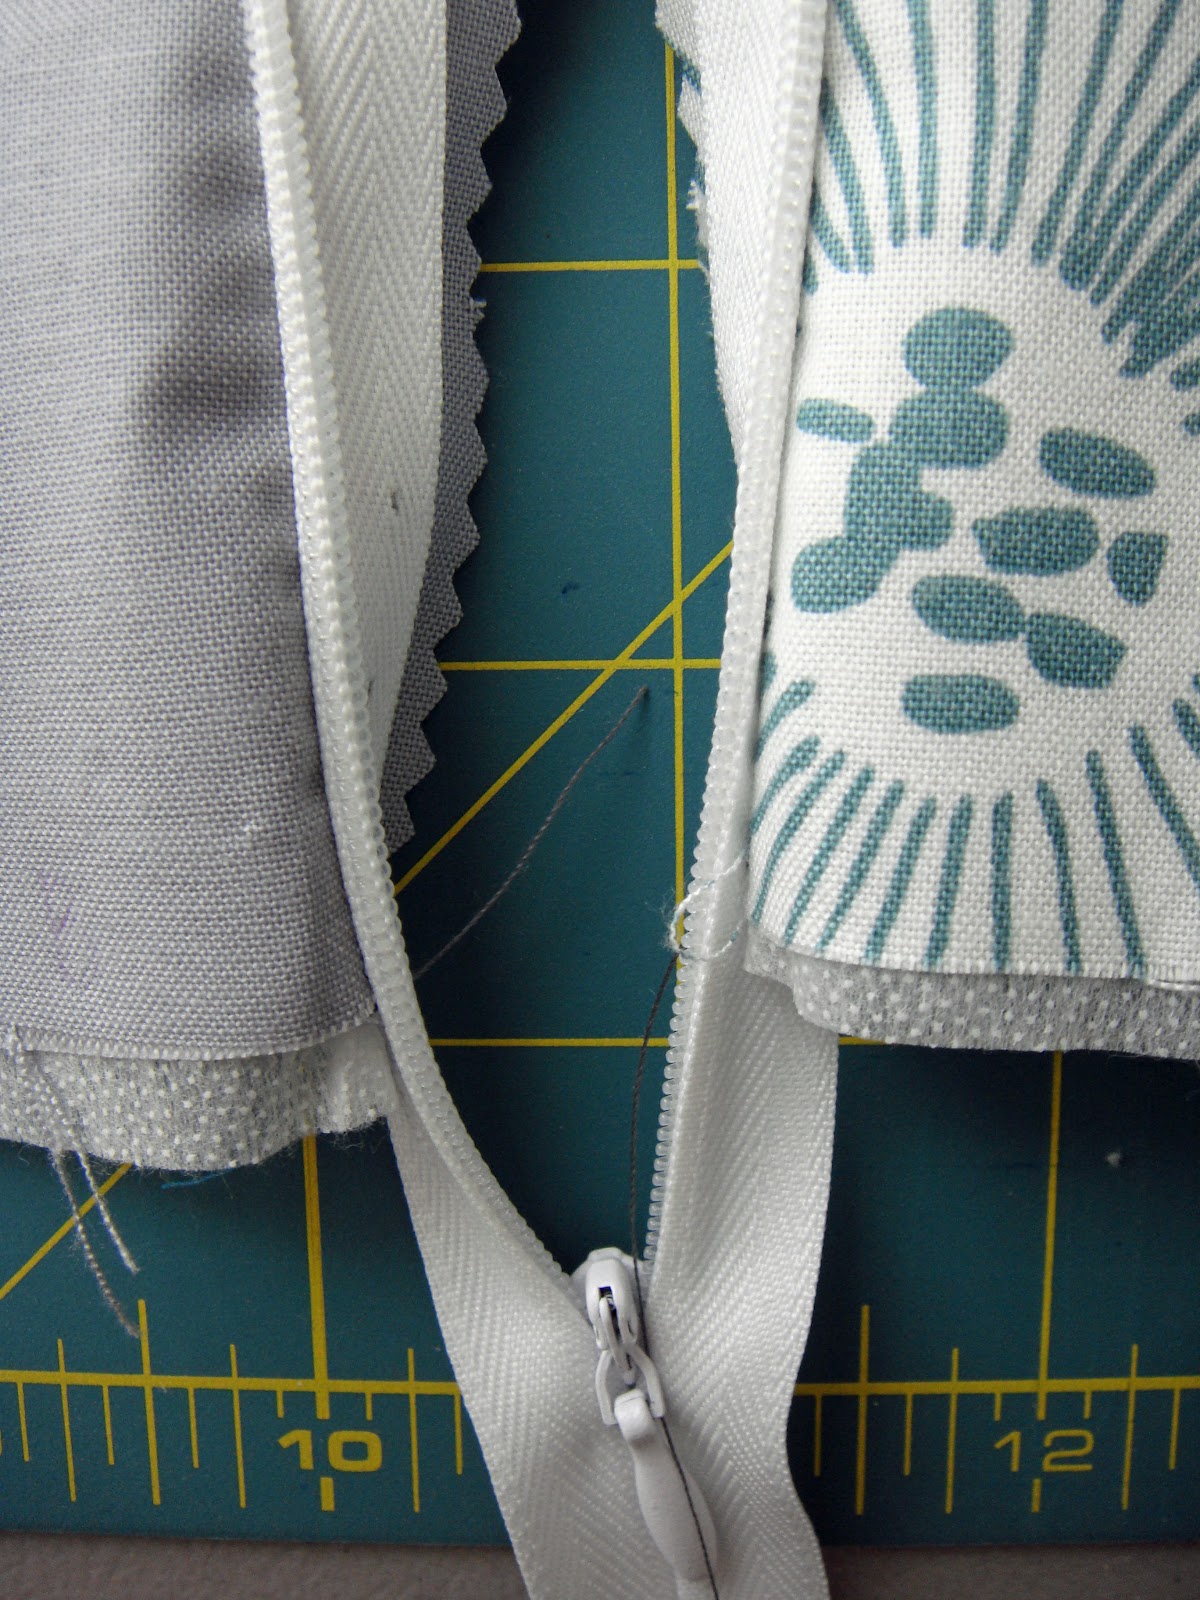
4. Unzip the zipper. Place the LEFT zipper tape on the piece of fabric on the right [aka your top fabric]. Pin it so that the zipper side is facing down with a 1/2" seam allowance. The zipper tape should be near edge of the fabric, not the coils. Use way more pins than shown in the photo. You want a pin about every inch or so.

5. Place your zipper foot on your sewing machine. You want to place it so your needle is going up and down on the left side of the foot, as shown in the above photo.


6. You will need to use both hands to sew the zipper on. Your left hand should be holding the zipper teeth as flat as possible while your right hand guides the fabric through the machine. You need to get the needle as close to the zipper coil as possible. Sorry for the blurry photo! *Helpful hint: If you look at your invisible zipper you will see that the tape has a herringbone pattern to it, and then close to the coils there is no pattern. You want to be sewing in the no-pattern area.

7. Trim seam down to 1/4" with pinking shears. If you do not have a pair, you can trim down and then zig-zag stitch to keep the edges from fraying.


8. Take the RIGHT zipper tape and place it face-down on the left fabric. It will seem like you're twisting the zipper and it could never possibly end up ok, but it will. Pin and sew like you did the previous side. Trim with pinking shears or zig-zag stitch.

9. Zip up your zipper and admire your handiwork! Now we need to put some finishing touches on to make it look really great!

10. Iron each side, pressing as close to the zipper as possible.

11. Top stitch approximately 1/8" from the zipper coils on each side. It's easier if you unzip the zipper first.

Note: You'll get better over time at stitching close to the zipper coils even without an invisible zipper foot. The Echo pillow back isn't stitched as close as I would have wanted, but it's hard to tell from a distance. The Silent Cinema backing is much more ideal!

12. Zip the zipper back up. Place pillow front and pillow back wrong sides together. Pin in place.

13. Pin just outside the top stitching on both sides of the zipper. Then unzip a few inches. This is VERY important! You don't want to accidentally sew over your zipper pull when sewing the binding on!
14. Stitch binding to the front of the pillow cover, backstitching over the area with the zipper for added security. Trim zipper ends even with edge of pillow.
15. Turn binding and secure on back with preferred method.

Wow that looks scary! I think for now I'll stick with the envelope style! Zippers and I have only just become friends =D
ReplyDeleteJust what I've been seeking! Thanks for sharing! :)
ReplyDelete