Monday, November 12, 2012

A Case of the Mondays

Happy Monday to all!

I've had to give up my Saturdays for the past two weeks to work, and it officially hit me that I've not really had any moment to relax in a few weeks, since I always use my one day free to clean/do laundry/take care of sewing obligations.

Luckily I have a couple things that are keeping me happy this morning:


This bundle of Don't Be Crabby! from Laurie Wisbrun to make up the quilt for one of the patterns I've been working on. Her fabrics are fantastic for cute little focal details and fussy cutting. She was nice enough to send this bundle after I approached her with an idea that just wasn't going to be feasible on her end. Can't wait to cut into it!


Now, this is a terrible picture, but it gets the point across. I have lots of fabric coming in a couple different orders in the next few days, with this being the first! I'm on a fabric-buying freeze, but I had to buy yardage of Winterkist for shop orders, so I just made the orders all worth my while ;)


And finally, quilting in progress! I'll have my finished Pillow Talk Swap package to show tomorrow.

Hope you have something to cure your case of the Mondays! :)

Friday, November 9, 2012

Do the Hustle


Um, Kelsey tells me there's only 50 days left in 2012?

::breathe::

Let's take a look at my list, shall we?

Must Do
1. Commissioned quilt with American Jane focal fabric 
 
 
2. Commissioned pillow with The Hungry Caterpillar fabric 
 
 
3. Blue and orange quilt for my little sister - no progress, but at least the blocks are all made
4. Set of pillows for my older sister's birthday - well, this has become a maybe Christmas present
5. King-size quilt for my bed - shelved until the new year due to the list at the bottom of the post
6. Pillow Talk Swap 9 - this will be done by the mailing deadline on Thursday; hoping to finish it tomorrow
Really, Really Would Like to Do 
 
7. Halloween pillows for my couch - ahem, not done, will be stricken from the list
8. Washi tunic - I cut the pieces out! Baby steps.
 
 
9. Banksia top
10. Pencil skirt out of linen - this probably won't happen, but I made a corduroy Schoolhouse Tunic instead, so I feel ok with it.
11. Autumn bunting - didn't happen, so will be stricken from the list
12. Christmas tree skirt - I just ordered a charm pack of Blitzen to make a simple tree skirt; I was paralyzed by wanting to make something perfect out of a design I came up with, but I realized I can always make another one at some point.
13. Shower curtain for my bathroom - almost certainly not going to happen at this point
 
So why is so little of my list completed? Because I now have a whole new list of things that really, really have to be completed because they're sales in my Etsy shop or magazine submissions [which I totally love and appreciate, it just all came in an onslaught!]:
 
- 5 gnoma advent calendars
-set of custom Quidditch Potter Pattern hoops
-bundle of 7 Potter Pattern hoops for a baby nursery
-hand-embroidered article of clothing that is taking waaaayyyy longer than I expected and is already 2 weeks overdue :(
 
I also volunteered to make a quilt out of blocks that are being donated for the Hurricane Sandy relief effort organized by Jennifer at Knotted Thread. I took a day off work to guarantee that it gets done if I can't do it in snippets here and there.

And now, after getting up at 6 am to go to work for a few hours on a Saturday, I'm going to take a nap and then tackle some of this list. Make sure you check out some of the other progress reports over at Kelsey Sews :)

Thursday, November 8, 2012

Sewing Confrontations: The One-Quarter Inch Seam


Jess came up with this fabulous idea and kicked us off last week, so make sure to read her post! Today is my day to tell you all about my deep dark secrets...

Hi, my name is Rebecca, and I once fed my little sister ice cream for dinner for 3 days in a row when I was in high school and my parents went out of town. Oh, not those secrets? Alright.

Confession: I've been sewing and quilting seriously for almost a year and a half and I haven't been sewing with an accurate 1/4" seam allowance this entire time.

I KNOW. I'm disgusting. I agree. But I'm here to save you from my fate.

Let's start by why an accurate 1/4" seam is important. I taught myself to quilt pretty much by trial and error and reading sewing blogs. They all talked about this seam allowance [side note: who decided it would be 1/4" in the quilting world?...that person must feel so smug all the time ha] so I just tucked it away as a fact.

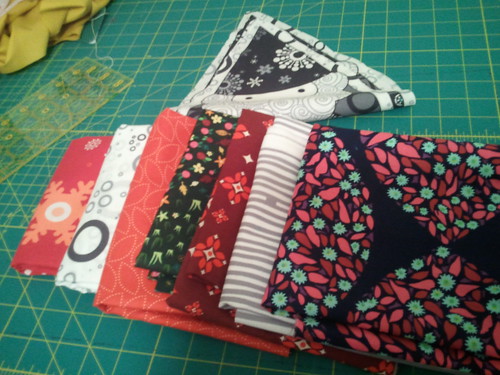
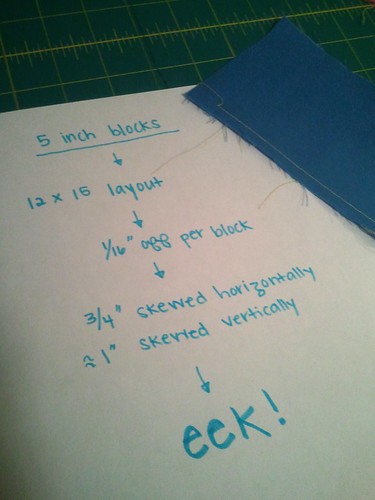
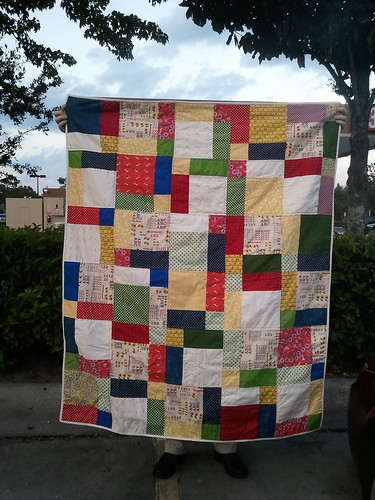
Let's imagine that you're following a quilt pattern, and you cut out all your fabrics listed all at once, and then you start sewing. Many people do this since it's quite a time saver. Our hypothetical quilt uses 5.5" unfinished blocks, and they should therefore finish at 5". We're using a layout of 12 blocks by 15 blocks for a 60"x75" quilt...a generous lap size.


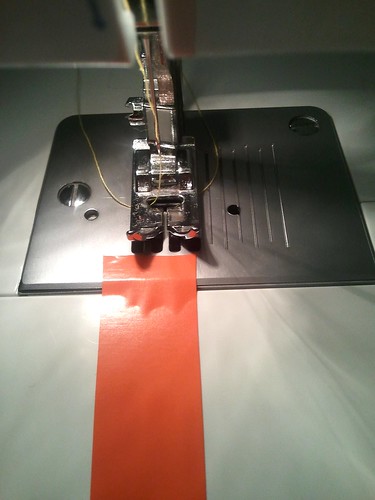
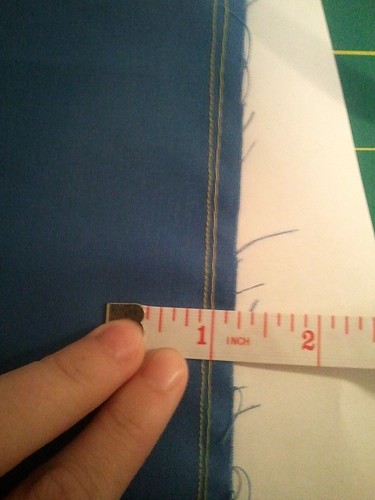
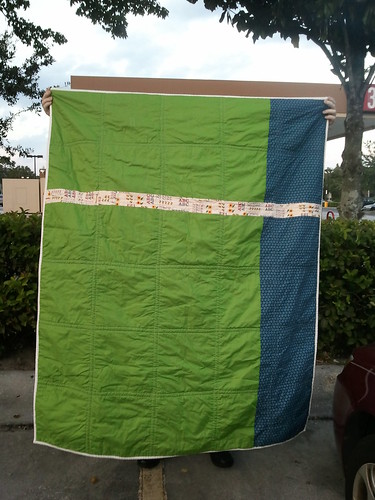
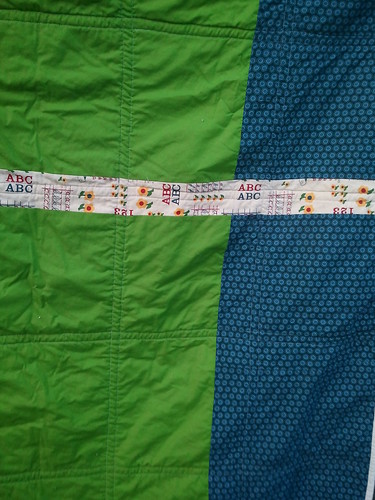
Imagine that this single piece of fabric is two blocks that I'm sewing together. I lined the edge of the fabric up with the edge of my presser foot, which is what I always do.


Aside from the horrific nighttime photo it looks great right? WRONG. When I went to measure the seam allowance, it's about 1/16" beyond the 1/4" mark. Big deal, right? That's not even a mark on the ruler, so it must be an inconsequential difference.


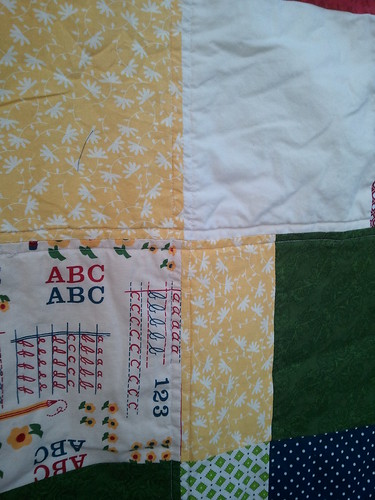
Wrong again! By the time we reach the end of 12 blocks, we'll be 3/4" skewed horizontally, and even more skewed vertically. Ok, so your quilt is going to be an inch smaller, pfft. The real upset here is that your blocks will be skewed from where they're supposed to actually be in the pattern, so they might not line up with other blocks. And let me tell you, there is nothing more tragic than cranking out 300 HSTs, trimming them, sewing them together, and then realizing that your rows don't line up.


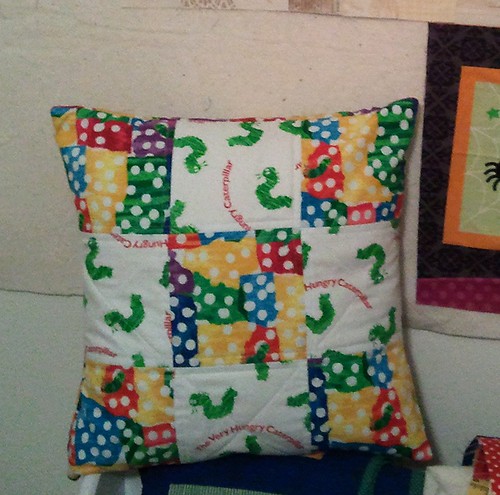
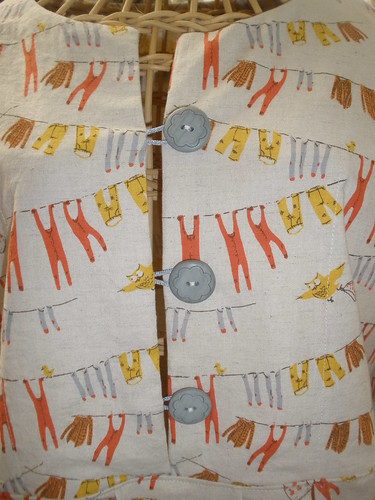
Take, for instance, my 1st Mustache Mini. Now, some of the fiddlyness is a result of poor cutting, which Jess wrote about last week, but much of it was also the fact that I've been sewing with an incorrect seam allowance. I made this "pattern" up on my own. I stitched up the mustache and then cut it to a size that I thought looked nice. That middle piece measured 6" square. So I said to myself, that's 6 one inch squares on each side. It would be 6 squares if I had an accurate 1/4" seam allowance. You can see at the corners that I had to stretch and pull to make the rows line up, and it didn't work at every corner. You can also see that my horizontal line above the cross-stitched center is totally not a straight line because of all the fudging I had to do. Good times...

Now, if you're like me then you almost never use a pattern when quilting. As a general rule if I'm making my own stuff up then I can get by just fine with my slightly-off measurements, if I make sure to not cut everything out at once and just kind of take it as I go along. It's sort of haphazard sewing and I know that most people would go crazy with that method.

So how can you fix an inaccurate seam allowance?

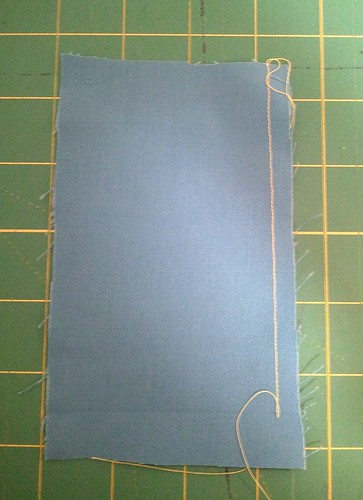
First of all, sew a line down a piece of fabric, like I did above, and measure so that you know what you're working with.

You could always get a quarter-inch foot, which is pretty popular among quilters. Confession: I'd rather buy fabric than notions. So I took a different approach:


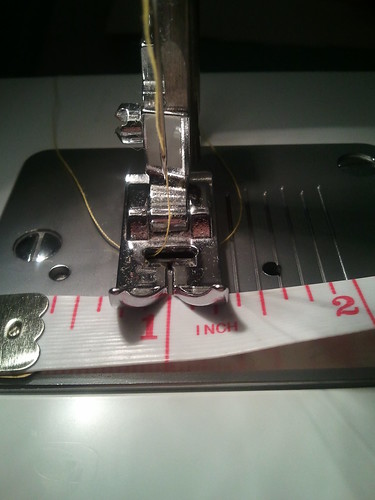
Use a flexible measuring device such as a dressmaker's tape measure or regular tape measure, not a ruler. Place it under your presser foot where the needle will be hitting, and line it up with an inch mark. Mark where 1/4" is.


I used to use washi tape to mark my machine when sewing, but now I use electrical tape because it stays put a little better.


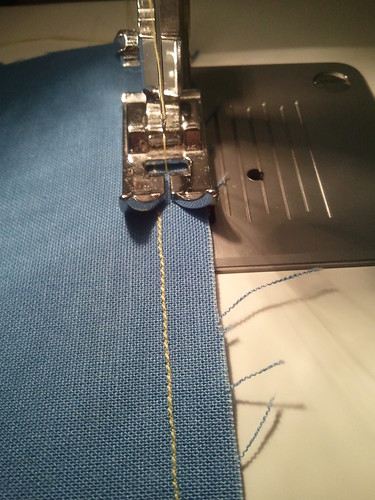
Then sew another line and use the marking to line up the raw edge of your fabric. Measure again. Ideally you want a "scant 1/4" seam, which means that your stitch line will be just inside the line marking 1/4" on the ruler. This allows for a little wiggle room due to the bulk of the seam when it is pressed.

So spend a little time before your next sewing session figuring out what your machine is actually sewing! It's the little things in your work that will start to make all the difference :)

We have lots more awesome stuff ahead every Friday in November to inspire you to challenge yourself, sewing-wise [even if you're like me and only sewing in the dark because you don't get home from work before 6:30]:


Kickoff: Friday, Nov. 2: Jess at Quilty Habit - Accurate Rotary Cutting
Nov. 9: Rebecca at Sew Festive Handmade - The 1/4 Inch Seam
Nov. 16: Val at PinkPlease! - Ruffles
Nov. 23: Rachel at Let's Begin Sewing... - English Paper Piecing
Nov. 30: DOUBLE POST: Katie at Swim, Bike, Quilt - Sewing with Knits
Kristina at Ornamental Confectionary - Making Pants
*AND link up at Quilty Habit with your own Sewing Confrontation!

Tuesday, November 6, 2012

Schoolhouse Tunic Sew-Along: Variations


It's the very final edition of the Schoolhouse Tunic Sew-Along!

So you've made a tunic/shirt/dress or you want to make one, but you want it to look different from everyone else's...what can you do?

There are lots of things you can do to bring variety to your pattern! Some we have already discussed in past posts, including personalizing the length of your garment, changing the neckline, and a couple of different sleeve options. Below I'm going to list some examples of things you can do to alter your pattern and how to go about it!

Source

1. Make the front bodice piece a coordinating fabric - Cut the front bodice pieces out of that fabric. Construction remains the same.

Source

2. Use trim along the bottom hemline and/or sleeves - Vintage trim could be really awesome for this, as well as some of the new trims that are coming out from popular designers such as AMH. If it's more of a ribbon type of trim then you can attach it with a top stitch.

Source

3. Change up the pleats - This alteration is particularly useful if you've made a muslin or made the pattern once and the shape of the pleats doesn't suit your body shape. The two-pleat version that is in the pattern creates more of a rounded shape, while a single pleat would create more of an A-line shape. To do this, simply find the center of the front skirt piece and then trace the pleat from the back skirt piece.

Source

4. Add trim around the neckline - Be mindful of the size of the trim and that it will be up around your face. You could use trims like tiny pom-poms that have to be sewn in when sewing the front bodice pieces to the seams, because they will stick out, or trims like the ric-rac shown above that will be added to the front bodice pieces before sewing them to the placket pieces. Also, your choice of color, shape, and size of trim can have different effects on the finished garment. The white-on-white above is a very subtle effect.

Source

5. Buttons! - The buttons will need to be installed like shown above, not like the buttons in a regular dress shirt. Well, unless you altered the pattern to create a placket. That's beyond the scope of this little post though. So you'll want to measure out button placement and make a mark on each side of the front bodice pieces. Make sure that the marks are where you want the buttons installed and not just on the edge of the fabric. Sew the button catches into the seams when sewing the front bodice pieces to the placket pieces. You can use elastic, ribbon, even fancy trim. Place the raw ends of the button catches so that they poke out of the seams, with the loops facing in. Make sure that your elastic/ribbon/trim is long enough to loop over the buttons.

6. Stitch up some of the V - If you don't like the look of buttons, but will want to keep the deep V a little more closed along the bodice, you could hand-stitch up the V to your desired opening point. I will probably taking this route on my own Schoolhouse Tunic.


7. Embroidery - You can stitch along the neckline or along the hemlines of the sleeves/skirt. The embroidery shown above is for a project that I can't show you for a long time, but I ran out of time to embroider the bodice that I was going to use for an example for this option. I drew out the design for this freehand, but there are plenty of embroidery patterns [free and for purchase] across the Internet that you could use. Just keep in mind the shape of the area that you want to embroider. For instance, the design that you would use for the straight bottom hemline is probably pretty different from the design you'd want for the neckline. Embroider the design on the neckline before attaching the front bodice pieces to the placket, and the hemlines before hemming. Just make sure that the design is outside of the seam allowance so that you don't lose it when stitching your bodice pieces together. If you embroider along the hem, try to make sure that your design fits fully within your hem, perhaps increasing the size of the hem to compensate. This will encase the threads along the inside of the garment and offer protection. Of course, if you choose to embroider then it is probably best that the garment be dry-clean only.

And now, I'd like to invite anyone who has followed along to provide a link in the comments to your garment, either finished or in-progress. I'd love to see all the garments that were made, and I'm sure everyone else would like to cheer you on as well!

I had fun doing this, and I hope that it encourages you to give making clothing a try, even if you're traditionally a quilter :)

Monday, November 5, 2012

Hold onto your hats people

*Just popping in super quick to apologize and say that the final post of the Schoolhouse Tunic Sew-Along will be up tomorrow instead of today.

Thanks so much, things are crazy around here!

Friday, November 2, 2012

PSAs


First up, a drive to make quilts for those affected by hurricane Sandy in the New Jersey area. Jennifer from Knotted Thread has posted here about the devastation in her hometown and stories of friends and family whose lives have been dramatically changed.

As a longtime resident of Florida I'm very familiar with hurricanes. I've been through quite a few. I've had damaged homes, loss of power, the inability to make phone calls to reassure people that you're okay. While destructive and heart-breaking, they all inspired an outpouring of community outreach and hope.

So please consider helping Jennifer's campaign...we may not be physically right next to the people of the Northeast as they endure Sandy's aftermath, but we can show them that we are committed to support them in any way we can, even if it's just the smell and feel of a freshly made quilt that has caring in every stitch.

---------------------------------------------------------------------------------------------------------------

Next, an awesome event I'm participating in...


 You can read Jessica's entire post here, but for the next few weeks a bunch of bloggers are going to be talking about improving a technique or challenging themselves with something new. Then on November 30th there will be a link-up for everyone to share their own confrontation!

Jessica put up her post today about cutting accurately. And boy is it a problem that I have all the time, mainly due to my impatience.

I'm up next week talking about that pesky 1/4" seam allowance, so check back in to hear my thoughts and see some fails and successes in that realm.

The schedule:

Friday, Nov. 2:  Jess at Quilty Habit - Accurate Cutting
Nov. 9: Rebecca at Sew Festive Handmade - The 1/4 Inch Seam
Nov. 16: Val at PinkPlease! - Ruffles
Nov. 23: Rachel at Let's Begin Sewing... - English Paper Piecing
Nov. 30: DOUBLE POST: Katie at Swim, Bike, Quilt - Sewing with Knits
Kristina at Ornamental Confectionary - Making Pants
*AND link up at Quilty Habit!

Schoolhouse Rock


How much did you used to love Schoolhouse Rock?! "I'm just a bill..." Ah, nostalgia.

So anyways, my commissioned quilt using some American Jane fabric at the request of the client. And if you've been reading for the past month or so, you've heard all the talk complaining about the process.

Well I'm done! Finally! Hallelujah!


Kitty: Oh look, a new toy just for me.
Me: No, Ares, move!
Kitty: I can help, promise. Watch me smooth down this batting.


I took these pictures in between work and dropping the quilt off with the client. So I was in a bit of a rush. This is getting marked as my least-favorite finish ever I think. After finishing the top I just felt creatively drained. I wasn't having fun making this, but I had to do it.


I actually like the back. I added in my absolute last scraps of the American Jane fabric [seriously Rebecca, why did you only buy 1/2 yd when it was super on sale?] and pieced it so that it didn't just look like I added a strip of the blue Oval Elements onto the side because the green wasn't wide enough. Which is the truth. But still. That's where the effort stopped on this quilt though. I wish I had done more quilting than the straight lines that you can see here. There was potential for some great quilting, but I was over it, and didn't want to have to sit on the quilt top for even another day. I wanted it done.


Yep, that's a bobble-head-esque Robert E. Lee up there. And a cannon. In the courtyard. Only in the South.


This is actually where the pictures above were taken, not that you can really tell. I was originally going to take pictures in the gardens at my work [and I still plan to do that with  my next quilt] but Thursday was so wild that I didn't even make it to my office. So these are taken at a middle school that I volunteer at Thursday afternoons. I was tickled that this quilt was made for a teacher for her reading corner and has ABC fabric in it, and the pictures are at a school. No? Not you? Well, it's the little things in life.


Do you make your significant other hold quilts up in parking lots at very busy intersections so you can get a straight-on shot of your quilt? Because I do. Do you make him leave his dinner so that you get the pictures in the last few minutes before it gets dark? Because I do that too.


That's true love, my friends.


How many pieces of American Jane fabric had to be pieced together to create a long enough strip to go the width of the quilt? I certainly don't know. But I do know that some of the pieces were only 2 inches wide, but they were all that I had left to use!


While there were no problems with puckering on the back of the quilt, I know that I didn't baste this very well because I had some drag on the front that resulted in little "puffs" near the intersections of all 4 lines. I think my goal for 2013 is to become a perfect quilt baster.

All in all, I'm glad to be done. And the person who ordered the quilt? He loved it. And so did his girlfriend. Who saw a picture of the top when she was using his phone on the evening that I happened to text him a picture of the unquilted top. We kept it a secret for about 3 months and then 2 days before delivery she found out. Ah, well...

*Linked at Finish it Up Friday!