We're back with another Christmas in July tutorial! Another Jessica is with us this week, and is the same Jessica that I swapped with about a month ago. In a bizarre twist of fate, she lives near where I went to college, and so if I had only started blogging a year earlier then we could have sewed in real life together! She has SUCH an adorable project today that I might just melt at the cuteness.
________________________________________________________________________________
Hello everyone!! My name is Jessica, and I blog at Make Me Crafty. I got in to sewing about a year
and a half ago, and have become completely addicted…I’ve been having so much
fun exploring different techniques and learning new skills. I live in North Central Florida and my hubby
and I are expecting our first baby in early August! One of the main reasons I wanted to sew to
begin with was so that I could make things for my children, so I’m very excited
to be starting that now. I’d love for
you to stop by and see what I’ve been up to, I love hearing from new people so
leave me a comment if you stop by!
Materials:
-Patterns (click link to download)
-Various scraps
-Backing fabric (each coaster is approx. 5”x5”)
-Batting
-Fabric for binding (approx 24” worth of binding strips per
coaster)
-Basting Spray/pins
-Wonder under or other fusible webbing (optional)
-Tear-away stabilizer (optional)
-Embroidery thread/needles (optional)
**For this tutorial, I am going to demonstrate the steps using the Reindeer pattern, but you can follow the directions for all the patterns (at the end of the tutorial I list the piecing order for each pattern)**Also, I've tried to show the basic steps for paper piecing, but here is a great series on paper piecing if you have troubles**
Start by printing out the pattern pieces. Make sure you print them with no scaling. I print mine on just regular old computer paper, but you can also use foundation paper. Now cut out your pattern pieces..the pieces have a
quarter inch seam allowance, indicated by the dotted line. I recommend having the design print out handy
so you know where your different colors go
Start with Section A and cut out scraps to fit, allowing at
least a half inch extra on all sides for seam allowance and wiggle room…I
personally like to cut my pieces WAY too big because I’m a bit geometrically
challenged and the angles always get me…
Place your scrap for piece A1 on the backside of the paper,
right side up, making sure you’re completely covering the whole section
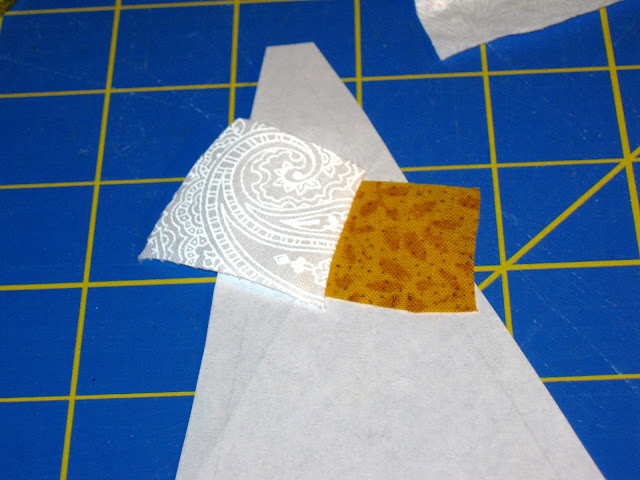
Place your scrap for piece A2 rightside down on your first
piece, hold it up to a light to make sure the line separating A1 and A2 is
covered, and that when you fold over A2 it will cover the whole section
Set your machine to a shorter stitch length, place your
pieces on the machine with paper side up (for the first piece, I like to pin in
place, especially with smaller pieces, so they don’t shift), and sew on the
line separating A1 and A2. Make sure to backstitch at each end, and go just one
or two stitches past the end of the line so that everything gets locked in
place
Trim off the excess to a quarter inch seam allowance from
the line you just sewed and press the pieces open
Trim around the edge of the pattern piece, I also sometimes
like to baste around the edge within the seam allowance which makes sewing the
pieces together later a little easier (though it does make ripping the paper
out more difficult, just to warn you!)
Now sew the pieces together, first connecting pieces C-D-E,
then connect piece F, then B and finally piece A. Square up your block and tear out the paper
(be careful not to rip out any seams!) I’m not really sure what happened when I
pieced mine together, this didn’t happen in the first one I made, but somehow
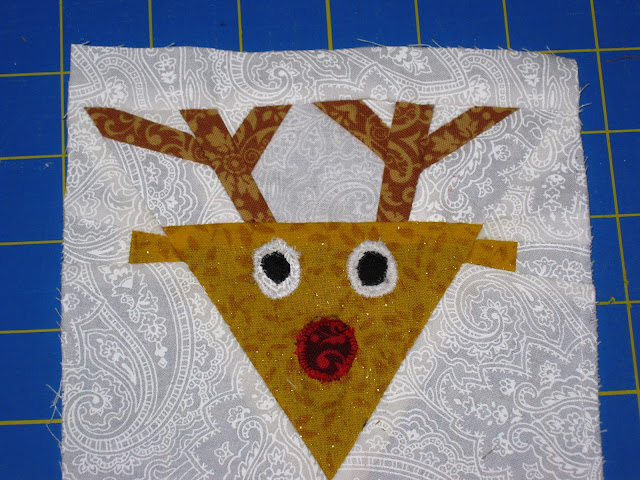
when I squared up this one I lost a bit of my antlers…I just added a one inch strip of the
white across the top to make my block 5-1/2” square again, no worries! At this time, I also sketched on the face
that I wanted him to have
Now here is where you have some options…you can make the
face however you want, with whatever method you like...heck, you don’t even have to have a face if
you really don’t want to. For the reindeer face, I chose to applique. You'll see in my final photos that for Santa's face, I used fabric paint, and I used a little embroidery to decorate the Christmas tree. Just have fun with it!
If you do choose to applique, here is how to do it:
Cut out the pieces and lay them down until you get what you
want. Iron on little pieces of fusible
webbing to the back of the pieces, and then onto the block to hold them in
place while you sew. You can also add
tear-away stabilizer to the back to help everything hold up right if you feel
like it, though I don’t always find it necessary
There’s a couple
different methods of appliqué, one is to use a satin stitch around the edge
which is what I did for the white part of the eyes and the nose. Set your machine to a zig-zag stitch with the
stitch length very short, and the width whatever your preference is, though in
this case I’d recommend fairly small since we’re dealing with very small pieces
here. Test it on a scrap piece of fabric
until you get your desired look.
Carefully stitch around the outer edge of your pieces, since
these are such small, tight curves, I find I have to stop and lift the presser
foot to rotate the fabric every once and while, which is totally fine. For the black part of the eyes, I left it raw
edge, and just used a straight stitch just inside the black part
Baste your quilt sandwich together using your preferred
method, I used basting spray
Quilt as desired, then apply your binding, and you’re done!
I am not showing steps for the binding because I am certainly no expert and if you need to know how to bind, you're probably better off following any of the many binding tutorials you can find elsewhere, such as here or here.
The rest of the patterns you will follow the same instructions for paper piecing, and sew the pieces together in the following order (please don't ask me why I didn't make the pieces go in alphabetical order...I apparently wasn't thinking clearly!):
-Santa: A-B-C
-Candy Cane: C-D-E-B-A *note about section B: I later noticed that this whole piece is a rectangle and since it's the background color, there's no need to piece it together, so you can ignore the line in the middle and treat it as if it's one big piece...
-Reindeer: C-D-E-F-B-A
-Tree: Only one piece, woohoo!
There is certainly all kinds of fun you can have with these
patterns, not only by embellishing them, but also with what you use them for! I
can see these wrapped up nicely as a nice hostess gift, enlarged to make some
minis or even a table runner. Feel free
to have fun, and if you do create something I’d love to see photos!
__________________________________________________________________________________
Thanks Jessica!
Ok, so who's itching to make these cute little paper pieced patterns?! How many of you have started a project in preparation for the linky at the end of the month? Remember, there's prizes up for grabs!
And speaking of prizes, you still have until midnight tonight to enter to win a charm pack of JOY from Urban Stitches!


Love the reindeer! Looks like a fun tutorial!
ReplyDeleteOH MY GOODNESS - how cute are they! Great project Jessica, i'm definitely trying these!
ReplyDeleteOMG so cute! I haven't tried paper piecing yet, and this looks like a great place to start! :D
ReplyDeleteAAaaaahahahahahaha those are adorable! I have 5 g-niece&nephews - with just a little bit of modification these would make perfect Christmas placemats for the kids!! They'd also make sweet milk and cookie mug rugs for Mr. Claus's treats :)
ReplyDeleteThey are the coolest coasters ever!!! =D
ReplyDeleteI'm just learning to do some paper piecing--thanks for the pattern and tutorial! Very cute!
ReplyDeleteSomehow missed this tutoril so am catching up - THESE are so darn cute. I shall attempt these!!! Thank you!!
ReplyDeleteThese are darling! Great gift idea too.
ReplyDeleteThese are so cute!! You could even put a few together into a runner or a placemat or something :)
ReplyDelete