Happy post-Christmas, everyone!
I have another handmade Christmas present to share in the next few days, but for today I'm sick and miserable at work...I'm also the only one in the office, which means I'm researching new sewing machines!
My parents offered to buy me a new machine for my birthday, yay! I was hoping you'd tell me if you like your machine or not :)
I have a budget of no more than $1000, and these are some things that are important to me:
-Large harp space
-Ideally it would sew more quietly than my last machine
-Ability to add an extension table
-Still needs to be able to do things like buttonholes and zig-zag stitches for clothing
Thanks everyone!
Thursday, December 27, 2012
Sunday, December 23, 2012
Handmade Christmas, part 1
So what was I making the other day out of that Echino?
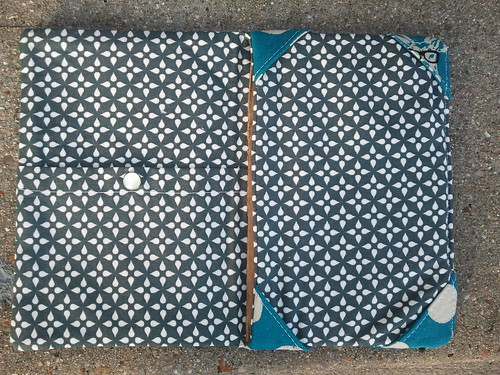
A tablet cover! My sister had a tablet on her Christmas list, but found one at a bargain on Black Friday. So she changed her request to accessories for her new tablet.
Now, there are plenty of tutorials for covers for Kindles and Nooks and even iPads. But a Samsung Galaxy S Note? None. So I pulled up the Kindle cover tutorial over at Whipstitch, and I pulled out my math skillz. The one downfall of this is that Deborah doesn't list the Kindle's measurements that she starts with to create her cover. So I was really just winging it to know what kind of ease she was working with in her pattern. Here's to hoping it all worked out okay.
Pros:
- I specifically wanted a cover that my sister could be using her tablet while still protecting it, and not just a sleeve for travel, so this tutorial was perfect
-It didn't require any crazy interfacing or materials that I didn't have on hand
-It's pretty customizable, and I'm not talking about different tablets, I'm talking about extra pockets, etc
-The pocket behind the corner tabs allows for extra security when the tablet isn't in use [the cardboard in the above photo is my makeshift tablet to test my math]
Cons:
-The pattern as it was would come out to be a little "floofy" to be a good cover, in my opinion
-At one point in the construction you would have been sewing the inside piece, the corner pieces, the elastic, the batting, and the outer piece together. That's a lot to hope doesn't wiggle around, even with careful pinning.
Things I changed:
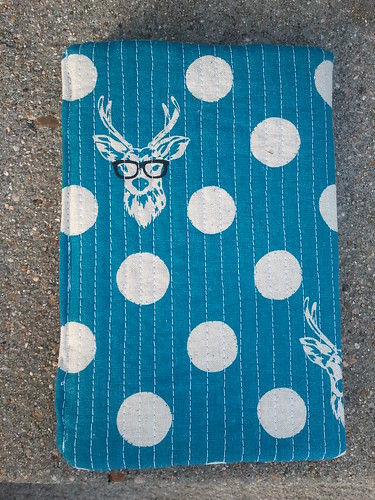
-I quilted the batting to the outer piece of fabric. I interfaced the Echino as well, but I wanted it to be more stiff, and knew that quilting would help. It was super helpful when sewing all the layers together that the batting wasn't going to shift. Plus, hello, cute!
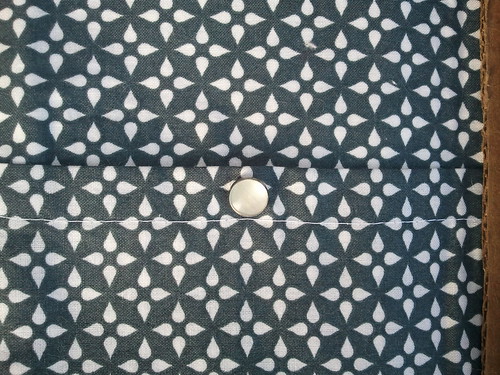
-I added a pocket on the left-hand size by simply cutting some Washi to the length of the entire piece, folding the top edge over twice and top-stitching. I added a pearl snap for extra security in case she wants to put headphones in it or something.
-I made a sleeve for some template plastic, and slid it in the pocket in the middle to give the whole thing extra support. Kind of like what you do for the bottom of bags. I actually tried to sew the plastic into the back of the middle piece where the corners are, but it just wasn't working to be able to turn the entire thing right-side out at the end, so I gave up and re-improvised.
Things I would change if I did this again:
-The corners were a bitch. There's just no other way to say that. As you can see in the above photo, it's still a little wrinkly...I might try to redo it again. There's just so much going on in those right-hand corners. So I decided I would extend the cover by a strip about an inch wide on that side, allowing the corners to be sewn into that strip, and then forming a new corner to be turned right-side out.
-Which leads into my next future change...I'm not sure I'm loving the elastic on the outside. I really wanted a magnetic snap, or even the pearl snap like I put on the pocket. Or a zipper if I'm feeling wild. But because the corner tabs are right at the edge of the cover, it doesn't allow for any different closure options.
-I'd add some super stiff interfacing at some point during construction so that it's more comparable to a cover you'd find in stores.
Hopefully my sister likes it!
A tablet cover! My sister had a tablet on her Christmas list, but found one at a bargain on Black Friday. So she changed her request to accessories for her new tablet.
Now, there are plenty of tutorials for covers for Kindles and Nooks and even iPads. But a Samsung Galaxy S Note? None. So I pulled up the Kindle cover tutorial over at Whipstitch, and I pulled out my math skillz. The one downfall of this is that Deborah doesn't list the Kindle's measurements that she starts with to create her cover. So I was really just winging it to know what kind of ease she was working with in her pattern. Here's to hoping it all worked out okay.
Pros:
- I specifically wanted a cover that my sister could be using her tablet while still protecting it, and not just a sleeve for travel, so this tutorial was perfect
-It didn't require any crazy interfacing or materials that I didn't have on hand
-It's pretty customizable, and I'm not talking about different tablets, I'm talking about extra pockets, etc
-The pocket behind the corner tabs allows for extra security when the tablet isn't in use [the cardboard in the above photo is my makeshift tablet to test my math]
Cons:
-The pattern as it was would come out to be a little "floofy" to be a good cover, in my opinion
-At one point in the construction you would have been sewing the inside piece, the corner pieces, the elastic, the batting, and the outer piece together. That's a lot to hope doesn't wiggle around, even with careful pinning.
Things I changed:
-I quilted the batting to the outer piece of fabric. I interfaced the Echino as well, but I wanted it to be more stiff, and knew that quilting would help. It was super helpful when sewing all the layers together that the batting wasn't going to shift. Plus, hello, cute!
-I added a pocket on the left-hand size by simply cutting some Washi to the length of the entire piece, folding the top edge over twice and top-stitching. I added a pearl snap for extra security in case she wants to put headphones in it or something.
-I made a sleeve for some template plastic, and slid it in the pocket in the middle to give the whole thing extra support. Kind of like what you do for the bottom of bags. I actually tried to sew the plastic into the back of the middle piece where the corners are, but it just wasn't working to be able to turn the entire thing right-side out at the end, so I gave up and re-improvised.
Things I would change if I did this again:
-The corners were a bitch. There's just no other way to say that. As you can see in the above photo, it's still a little wrinkly...I might try to redo it again. There's just so much going on in those right-hand corners. So I decided I would extend the cover by a strip about an inch wide on that side, allowing the corners to be sewn into that strip, and then forming a new corner to be turned right-side out.
-Which leads into my next future change...I'm not sure I'm loving the elastic on the outside. I really wanted a magnetic snap, or even the pearl snap like I put on the pocket. Or a zipper if I'm feeling wild. But because the corner tabs are right at the edge of the cover, it doesn't allow for any different closure options.
-I'd add some super stiff interfacing at some point during construction so that it's more comparable to a cover you'd find in stores.
Hopefully my sister likes it!
Thursday, December 20, 2012
Santa's Little Helper
Phew, with Christmas only a few days away I'm looking forward to the weekend in order to finish up a few presents. I didn't make too many presents this holiday season, due to my lack of personal sewing time, but I'm pretty excited for the few that I did make!
Any guesses for what that's going to be? :)
Friday, December 14, 2012
Finish it Up Friday - A Collaborative Quilt
- Made for Hurricane Sandy effort
- Blocks were sent from all over the world [all extra blocks were forwarded on to Jenn to hopefully make another quilt!]
- Approximately 58x67"
- Scared the beejeebus out of me when I pulled it out of the wash and the traditional fabrics had bled onto the white within their individual blocks! Washed a few more times and hopefully it's not too noticeable. That's the first time that's happened to me :(
- Snuggly blue polka dot flannel backing
- Someone made and mailed me binding and I'm not going to lie, it was HEAVEN to have it made already. So I'm accepting applications for a binding-maker ;)
- Used up every last creative juice I had for the end of the month of November, since I overextended myself last month, and was a grumpy mess by the end of it. I was excited to make the quilt, but was having the darndest time coming up with a solution for mixing the modern and traditional fabrics and combining the blocks that were oriented in different directions.
- Made a coral star out of Silent Cinema for one of the warm color stars [top left]
- Quilted using straight-lines around the star blocks and then squares quilted in the negative space. I wanted to just straight line quilt in the sashing, but my sashing didn't line up because I had to fudge a little on sewing some blocks together to make them all the same size. So the squares were my quilting solution. And in the end, I like it.
- Quilted using my mom's old machine, which was bizarre, and the reason I couldn't FMQ it. Also, her machine is quieter than mine, which was glorious.
- Made up an extra top and backing out of an old sheet set and some patriotic blocks that were sent. I dig it.
- Sent Jennifer a 45" square Children at Play quilt that was the first quilt I ever finished, so hopefully she can find a kid who needs a little bit of whimsy
- Speaking of Jennifer, she needs the biggest thank-you in the world for organizing all of this. Such a big heart!
- Thanks also go out to all those who contributed blocks, sent me batting, pre-made binding, and a quilt label
- It makes me feel really good to be part of this community :)
- Someone please finish my Christmas shopping for me. Please.
Monday, December 10, 2012
Burning the midnight oil
Because I know we're all short on time this month...
This quilt top is now a completed quilt for the Hurricane Sandy efforts, with its own post coming soon.
This very simple and patriotic quilt top will hopefully get some simple quilting tomorrow after work so that I can send it off to Jennifer just needing some binding attached.
These came in the mail today and are the first pieces of Echino and Nani Iro that I've owned. The Echino will be made into some Christmas items, but the double gauze is all for a shirt for me, and I couldn't be more excited about it!
I hope everyone's holiday sewing is going well :)
This quilt top is now a completed quilt for the Hurricane Sandy efforts, with its own post coming soon.
This very simple and patriotic quilt top will hopefully get some simple quilting tomorrow after work so that I can send it off to Jennifer just needing some binding attached.
These came in the mail today and are the first pieces of Echino and Nani Iro that I've owned. The Echino will be made into some Christmas items, but the double gauze is all for a shirt for me, and I couldn't be more excited about it!
I hope everyone's holiday sewing is going well :)
Wednesday, December 5, 2012
The Replacements
Major surgery on the left...no good news yet. Keanu Reeves on the right...a little bit older, but still a power player. If you didn't take note of the title of this post then you're probably wondering why that sewing machine is named Keanu Reeves?
[Had to borrow my mom's machine to finish my Hurricane Sandy quilt!]
Saturday, December 1, 2012
Gnoma overload
Because I totally realize that I've shown far too many of the same project with the Winterkist gnomas I'm here instead to show...
...a new project with the Winterkist gnoma! You had to see that coming, right?
My sewing machine broke as I was finishing the last advent calendar order, and kind of pulled the calendar up into the machine. I was absolutely distraught at this point, but I contacted the customer as soon as it happened and explained that I'd no longer be able to guarantee a December 1st delivery, so I'd refund her money.
She was incredibly nice about it and said that her family had planned to use the calendar as a second advent calendar with which to do good deeds throughout the holiday season. Like, sing carols at a nursing home, etc. What a great idea, right?! So they didn't really need my version, but her kids had really fallen in love with the gnoma [and who wouldn't, he's so cute].
I emailed her back and offered to make up a different idea: a stuffed Santa gnoma that would have a single pocket that could be filled with a little note indicating the daily good deed. Since he would be more like a stuffed animal, he would be portable and could take turns "living" with each kid in turn.
So since my machine is out of order at the moment, this little guy was entirely hand-sewn. The pocket edges are folded down and secured with fusible bonding. The front pocket is made out of a second large gnoma and placed so that it's almost perfectly aligned. The back pocket was something I added in the midst of making it, in case they want larger items like song lyrics or stories to be able to be tucked into this gnoma. He was stuffed with fluffy innards and stitched closed.
He measures almost 15" tall and will hopefully be well-loved!
...a new project with the Winterkist gnoma! You had to see that coming, right?
My sewing machine broke as I was finishing the last advent calendar order, and kind of pulled the calendar up into the machine. I was absolutely distraught at this point, but I contacted the customer as soon as it happened and explained that I'd no longer be able to guarantee a December 1st delivery, so I'd refund her money.
She was incredibly nice about it and said that her family had planned to use the calendar as a second advent calendar with which to do good deeds throughout the holiday season. Like, sing carols at a nursing home, etc. What a great idea, right?! So they didn't really need my version, but her kids had really fallen in love with the gnoma [and who wouldn't, he's so cute].
I emailed her back and offered to make up a different idea: a stuffed Santa gnoma that would have a single pocket that could be filled with a little note indicating the daily good deed. Since he would be more like a stuffed animal, he would be portable and could take turns "living" with each kid in turn.
| While the pocket is a little crooked, it's not as bad as it appears to be in the picture...gnoma doesn't stand up straight! |
So since my machine is out of order at the moment, this little guy was entirely hand-sewn. The pocket edges are folded down and secured with fusible bonding. The front pocket is made out of a second large gnoma and placed so that it's almost perfectly aligned. The back pocket was something I added in the midst of making it, in case they want larger items like song lyrics or stories to be able to be tucked into this gnoma. He was stuffed with fluffy innards and stitched closed.
He measures almost 15" tall and will hopefully be well-loved!
Subscribe to:
Posts (Atom)