Showing posts with label zippers. Show all posts

Saturday, September 8, 2012

Sartorial Saturday: Washi Dress


So what is it about this Washi dress?

That's a question I got last week from someone. And I thought about it and didn't really have a good answer. I'm not sure what made me greatly anticipate the release of this pattern. I think the simplicity of it appealed to me, and as someone who finds the Big Four pattern company patterns to really be lacking in instructions for beginner clothing makers, I was hoping that an independent designer would take more time in the directions.
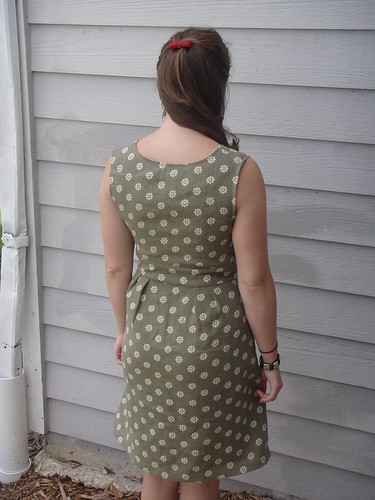

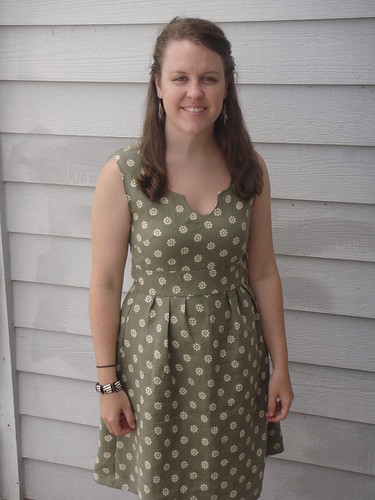
So I cut out the pattern pieces for a size Medium, as that is what best matched my bust measurements. But as you'll notice, I made some significant changes. I wanted to make the dress for a wedding I'm attending next month, and I wanted to use 2 yds of a linen-rayon blend that I bought months ago. I thought that the shirring on the back, while a fantastic aspect of the pattern, would make the dress more casual than I wanted. So I decided to omit the shirring and instead add an invisible zipper on the side seam.

What do you need to do to the pattern to accomplish this?
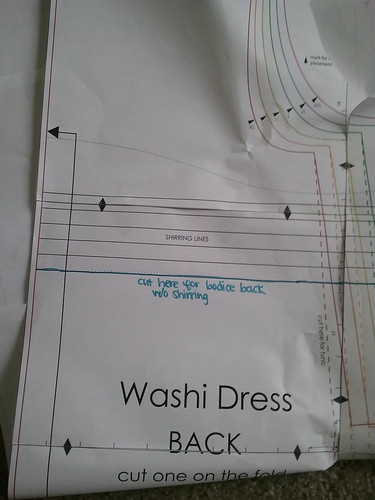

Cut the back piece as a separate bodice and a skirt. Cut the back bodice at the bottom shirring line. Follow the rest of the markings. I cut the front skirt out again for the back piece...because there's no shirring in the back of mine, I wanted to have the pleats in the back for extra shaping. Make sure that your new back skirt piece is as wide as the back bodice piece, or adjust accordingly. I had to remove one pleat from each side in order to achieve the right width. To clarify, I did not pleat the outermost set of pleat markings on each side of the back skirt.

Follow Rae's instructions to make the front of the dress. I also altered the pattern instructions a bit by not cutting into the bodice for the bust darts [see picture of the seams further in the post]. This means that I didn't have to finish the edges of the darts, and it doesn't affect how the bodice lays on my body at all. I also didn't add pockets, because I don't tend to use them in nicer dresses. To omit the pockets you just follow the dotted line down the side of the skirt piece that marks the tunic sides when tracing on your fabric, and just extend it all the way to the bottom.
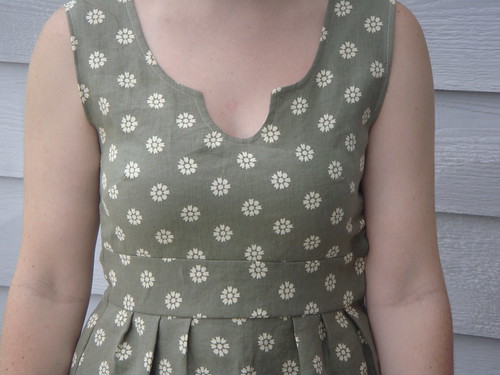

After I held my pattern pieces up to myself I realized that I didn't like where the bodice hit on me. It hit right under the bustline, and I would have wanted to lower it by an inch or two so it hit more at my natural waistline. However, I had already cut all my pattern pieces. I solved my problem by adding a waistband. I simply cut two strips that were 3.5" wide by the length of both the front and back bodice. I sewed those to both bodice pieces before I continued making the dress.

In order to add the invisible zipper you will simply sew the shoulder seams first, then add the zipper to whichever size you prefer. I sewed the zipper up to approximately 1/2" away from the armhole so that I could finish the armholes properly. Then add a hook-and-eye closure at the very top.


I should have known that everything was going so well that the zipper would be a fiasco, and it sooooo was. I'm actually a pro at installing invisible zippers by now, but you know what I did not once, but TWICE? I pulled the zipper pull off the teeth after sewing the zipper to the dress. I don't think I've ever cursed that much in my entire life. Sailors would have blushed had they heard. Good thing I had 3 zippers on hand...


I chose to finish all the seams I could as French seams, so the inside is the cleanest garment that I've ever made. Woo! You'll notice the seams are pretty wide. I had to remove almost 4 inches from each side of the dress [I didn't make a muslin; I just fitted as I went] and almost 3 inches from the hem [I'm almost 5"3] so I made the side seams wider and the hem deep so that I could have a little wiggle room if necessary. So next time I think I'd make a medium bodice and a small skirt.

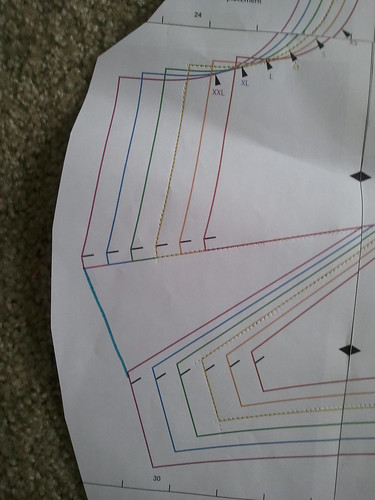
My favorite things about the pattern? The different colors for the different sizes on the pattern is fantastic. Seriously, so helpful! I also enjoyed learning how to make a placket, and it came out really nicely for me! Rae gives a few different options for finishing parts of the project, which is also awesome, because I don't really want to hand-sew on garments if I can avoid it.
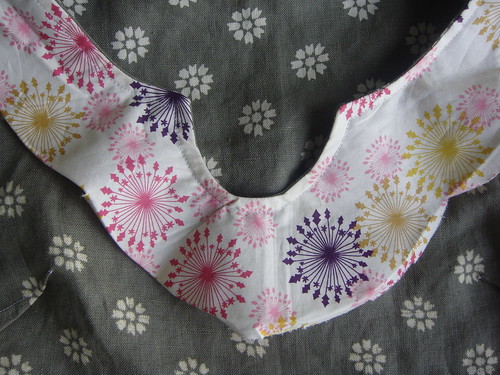

Things I didn't enjoy about the pattern? It's pretty vague when discussing understitching the placket to the bodice. I have absolutely no idea what that means, and the pattern didn't give me any clues at all. As a result, my placket is still wiggling free until I figure out what to do with it.
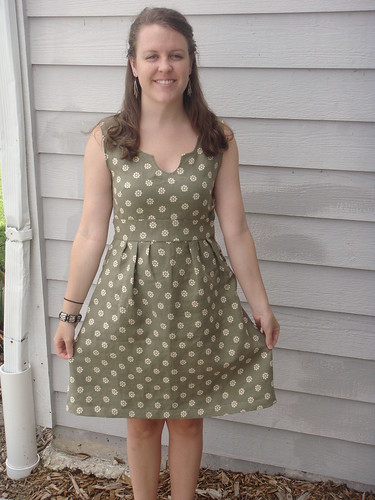

My final verdict? Great pattern that has the ability to be adapted to make several different items. Totally worth the price. So go get it! I'll be making a tunic version next :) This time with shirring!

Friday, June 29, 2012

How to Install an Invisible Zipper in a Pillow with Binding!


There are some great tutorials out there on how to install an invisible zipper in a pillow. But those zippers are installed on a seam at the bottom or side of the pillow, and are sewn right sides together and then flipped right-side out.
But what if you like the look of binding on a pillow?
Are your only options either an envelope closure or a lapped zipper [when the zipper is covered with a flap of fabric]?
No!
So in celebration of the weekend, I've prepared a little tutorial on how to install an invisible zipper in a pillow cover. More specifically, in a pillow cover that you also would like to have a binding.

Now, don't be scared. I know that zippers are terrifying for many quilters, and you may have to go slowly at first, but I promise you can do this! In fact, once you get the hang of it, it's so much faster than an envelope closure!


Materials needed:
  •  Invisible zipper [I almost exclusively buy 20-22" invisible zippers]; you do NOT need to shorten it to the size of your pillow
  • Two pieces for your pillow backing - These need to be as wide as your pillow cover front, and then about an inch longer on each piece...for instance, for my 18" pillow I used a 12"x18" piece of Echo and an 8"x18" piece of light gray solid. [12+8=20...an extra inch on the top and bottom]. You can come up with your own measurements, just think about where you want your zipper to be on the pillow back, and go from there.
  • Lightweight fusible interfacing [optional]
  • Not pictured: Zipper foot - I use a regular zipper foot, but if you have an invisible zipper foot then by all means use it
  • Pinking Shears [optional]
  **Note: I apologize for the diagonal line of light across the photos; I was doing this as the sun was setting and no matter how I closed my blinds, it still peeked through.


1. I like to give my fabric a little extra support by fusing some interfacing to the edges where the zipper will be sewn. Zippers pull on the fabric a lot, and this can certainly help! If you choose to do this also, the interfacing should be 2-2.5" wide by the length of your fabric [18" in my case].


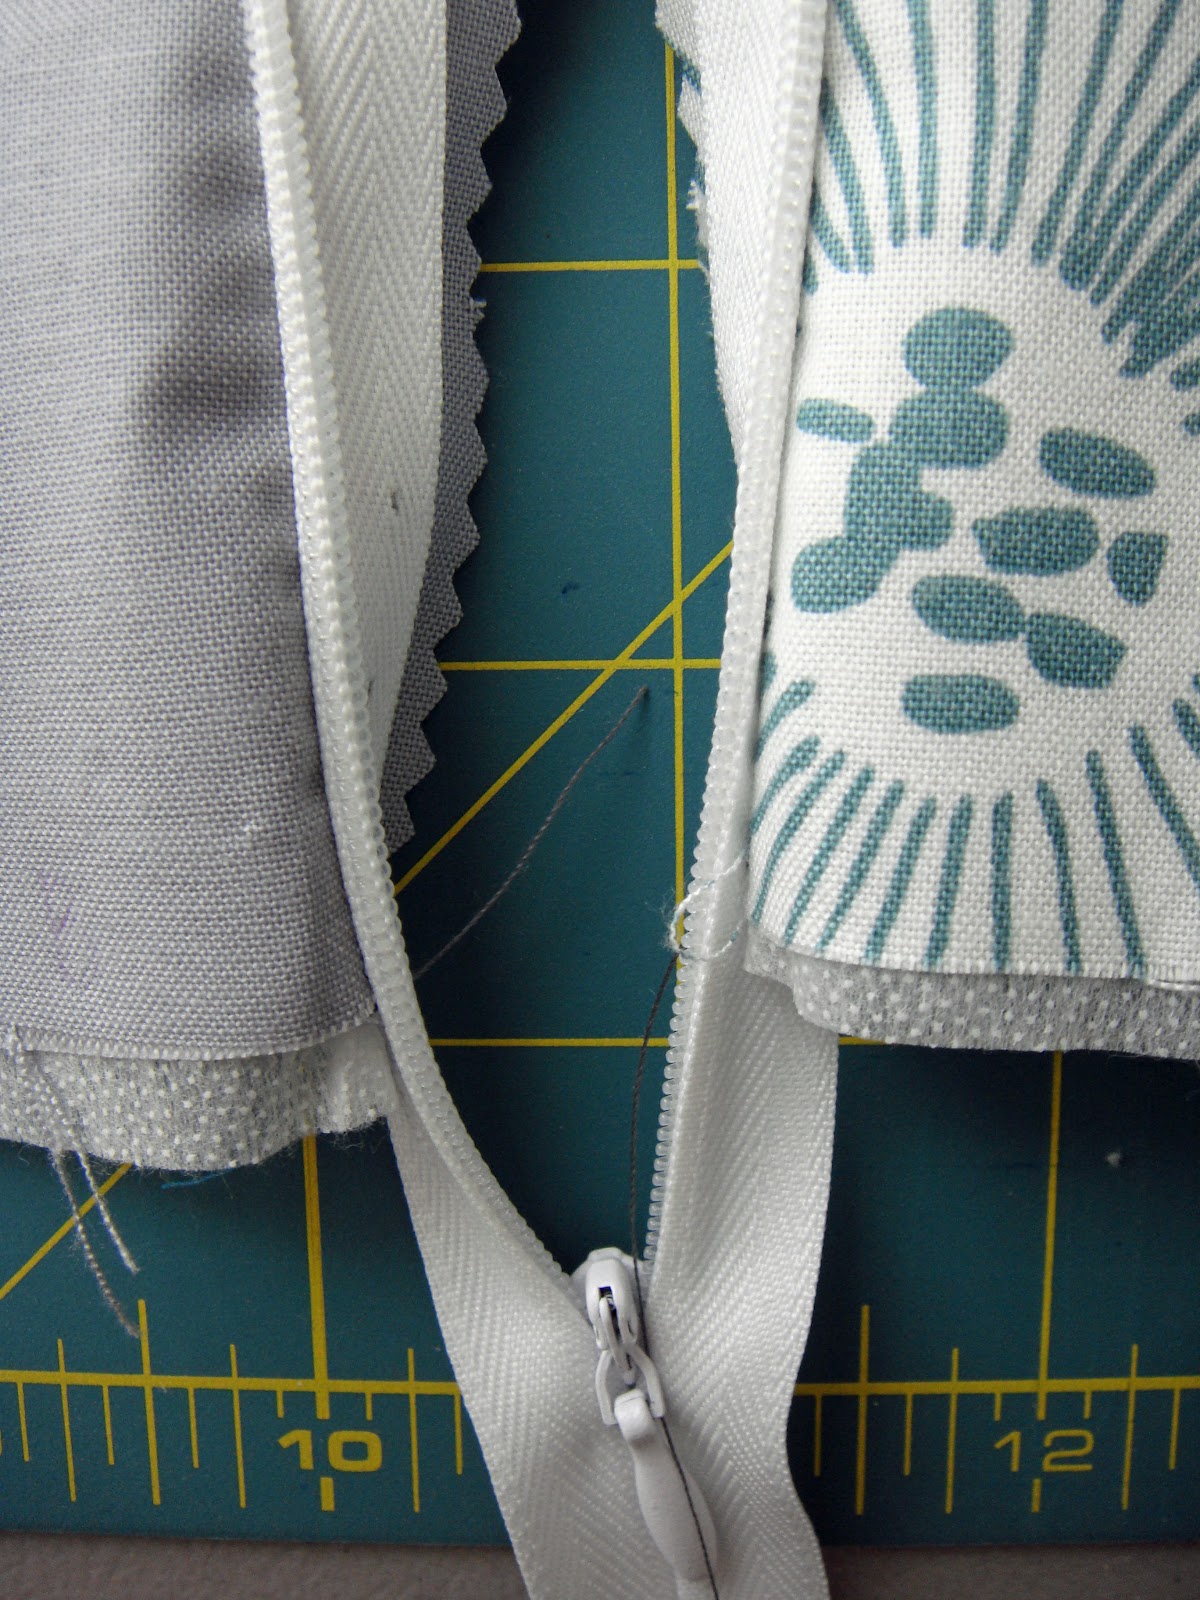
2. Iron your invisible zipper. The photo on the left shows the zipper right out of the packaging. The coils are turned under, which is the whole point of an invisible zipper. Using your fingers to help turn the coils to the front, iron the zipper flat. Make sure your iron isn't too hot, because the zipper coils can melt!

3. Decide which of your fabrics will be on top. In the photos, the Echo fabric will be on the top of the pillow backing. Rearrange your fabrics so that the piece that will be on top is on the right, and the other piece is on the left. The fabrics should be right-side up.


4. Unzip the zipper. Place the LEFT zipper tape on the piece of fabric on the right [aka your top fabric]. Pin it so that the zipper side is facing down with a 1/2" seam allowance. The zipper tape should be near edge of the fabric, not the coils. Use way more pins than shown in the photo. You want a pin about every inch or so.


5. Place your zipper foot on your sewing machine. You want to place it so your needle is going up and down on the left side of the foot, as shown in the above photo. 


6. You will need to use both hands to sew the zipper on. Your left hand should be holding the zipper teeth as flat as possible while your right hand guides the fabric through the machine. You need to get the needle as close to the zipper coil as possible. Sorry for the blurry photo! *Helpful hint: If you look at your invisible zipper you will see that the tape has a herringbone pattern to it, and then close to the coils there is no pattern. You want to be sewing in the no-pattern area. 


7. Trim seam down to 1/4" with pinking shears. If you do not have a pair, you can trim down and then zig-zag stitch to keep the edges from fraying. 


8. Take the RIGHT zipper tape and place it face-down on the left fabric. It will seem like you're twisting the zipper and it could never possibly end up ok, but it will. Pin and sew like you did the previous side. Trim with pinking shears or zig-zag stitch.


9. Zip up your zipper and admire your handiwork! Now we need to put some finishing touches on to make it look really great!


10. Iron each side, pressing as close to the zipper as possible.


11. Top stitch approximately 1/8" from the zipper coils on each side. It's easier if you unzip the zipper first.


Note: You'll get better over time at stitching close to the zipper coils even without an invisible zipper foot. The Echo pillow back isn't stitched as close as I would have wanted, but it's hard to tell from a distance. The Silent Cinema backing is much more ideal!


12. Zip the zipper back up. Place pillow front and pillow back wrong sides together. Pin in place.


13. Pin just outside the top stitching on both sides of the zipper. Then unzip a few inches. This is VERY important! You don't want to accidentally sew over your zipper pull when sewing the binding on!

14. Stitch binding to the front of the pillow cover, backstitching over the area with the zipper for added security. Trim zipper ends even with edge of pillow.

15. Turn binding and secure on back with preferred method.

That's it! I know it seems daunting with so many steps listed, but I promise it's really simple. If you have any questions just let me know in the comments and I'll try to address them! Go make yourself an invisible zipper closure! Go on! :)

Saturday, June 9, 2012

Sartorial Saturday: Nautical Striped Skirt

I'm a fickle, fickle clothing maker.

I have half-made garments floating around my home. I have a pretty impressive stack of apparel fabrics from lace to gauze to linen to knits. I want to buy indie clothing patterns left and right. So I made myself a deal...I have to use up about half of my apparel fabrics on patterns that I own before I'm allowed to buy more fabric or more patterns.


So Thursday night I made a skirt! It's 100% Pima cotton too! Cue angel music.

Now, unfortunately, I didn't measure too much while I was doing this. I simply held the original fabric length up to me, saw that it was more than enough to get around my hips, and decided that I would just gather it all to the waistband. So I cut the length in half, then cut one of the pieces in half again. I cut a long strip off the bottom to serve as my waistband [which I did measure].

I sewed all 3 pieces together to create a really really long piece. I was very, very careful to match all the stripes, and I did pretty well!

I used interfacing on the front side of the waistband to give it structure and support to hold up the rest of the skirt. It will also keep the waistband from wrinkling while wearing.

To gather that long piece to the size of the waistband, first I noted in the waistband where the center and side seams should fall so that I could try to gather the fabric evenly. Then I sewed 2 lines at the top of my skirt piece, making the tension as loose as possible and the stitch length as long as possible. Then I grabbed the bottom threads and pulled carefully [you don't want to snap the threads!], sliding the gathers along the skirt to even them out as best as possible.

I don't have any pictures of the next step because I was very intent on my task, but I put the skirt piece up inside the waistband, matching the center up first, and then the sides. I used a TON of pins, and just made sure that the gathering stitches were hidden by the waistband.


Invisible zippers give me cold sweats. But I grabbed my liquid courage [a glass of wine] and forged on. It needs improvement. More skirts!


A hand-sewn hook and eye closure keeps the waistband from gaping at the top where the zipper ends. You can see at the top there I also tacked down the seam allowance so it wouldn't fold over on itself there. I'm still trying to figure out a better solution for that, but this works for now.


The innards! French seams for the sides, the zipper seams are cut with pinking shears, and the hemline holds the side seams towards the back of the skirt.

So twirly!
 And, for your Saturday viewing pleasure, some photo shoot outtakes:

Me: Will you come outside and take pictures of me in my skirt for the blog?
Stephen: Can't I just take the pictures in here? Look, this one's nice.

Stephen: So after these pictures we should take a picture of you vacuuming in that skirt.
Me: What? Why?
Stephen: It's like big...and floofy...and something June Cleaver would wear. She vacuumed a lot, right?

Me: Are you kidding me?
Stephen: Well that's not a pretty face for the camera.

Happy Saturday! :)

Friday, December 9, 2011

Zipper successes!

My Friday Finish today [which I am celebrating with crazy mom quilts, as per usual!] is also a sewing milestone yay!

My 1st zipper experience.

And now I feel like I need to go sleep for days. Seriously, I feel mentally exhausted.


So my parents asked me to make 2 pillow covers for them so they could use some autumn throw pillows into the winter without having to buy new pillows. Since I can't really justify making more pillows for myself at this point, I was totally game.

Their house is decorated Americana style, and so I knew that they wouldn't go for anything that screamed modern. I drew out some designs and they picked 2 they liked. And then I totally deviated from those designs :) Artistic license, right?


I have lots of extra little pieces of Countdown to Christmas from the various projects I've used it in. Gosh, I love this line! I was originally going to do multiple strips of pieces in a single color, from multiple fabric lines. But hey, I started cutting, and this is what happened. Sometimes I can't help it. And then I found some white ric rac, and it got thrown into the mix too!


A zipper happened when I didn't have enough of the fabric I wanted to make an envelope closure. I had picked up a few zippers to make some pouches/clutches for my little sister [they have dinosaurs on them!]. I put my computer next to me at the table and pulled up the invisible zipper tutorials over at Sew Katie Did and Stitched in Color. I find that 2 tutorials is much better than one, in case one person wasn't as clear on an item.

Um, and then I tried to install a zipper. Like 9 times. Near the end I was getting very testy, and thinking it was not fun in the slightest. Very sad, as I think sewing is very fun and relaxing. NO. This was not.


I have no idea what my problem was tonight. I am usually very quick with instructions, and I'm fortunate enough to be very good at most things on my first try. Zippers do not go in that category. I even thought about pouring a glass of wine haha.

Here is my pearl of wisdom for the day: Sewing, and all things associated with it, teach you patience. There is really no fast way to get to many of the things you sew/quilt. Yes, there are techniques that make it a little quicker, but I still wouldn't call it fast.

I didn't press this, so it looks wrinkly and crooked

The back....just as cute!
So. I was reminded to be patient today. If it took me 9 tries, so what. Every time I see that pillow at my parents' house I'll be reminded that I taught myself how to do something and didn't give up. No it's not perfect this first time, but that's what those dinosaur pouches are for :)