Showing posts with label Sartorial Saturday. Show all posts

Saturday, September 8, 2012

Sartorial Saturday: Washi Dress


So what is it about this Washi dress?

That's a question I got last week from someone. And I thought about it and didn't really have a good answer. I'm not sure what made me greatly anticipate the release of this pattern. I think the simplicity of it appealed to me, and as someone who finds the Big Four pattern company patterns to really be lacking in instructions for beginner clothing makers, I was hoping that an independent designer would take more time in the directions.
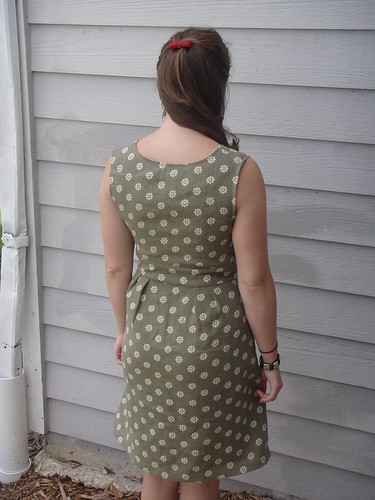

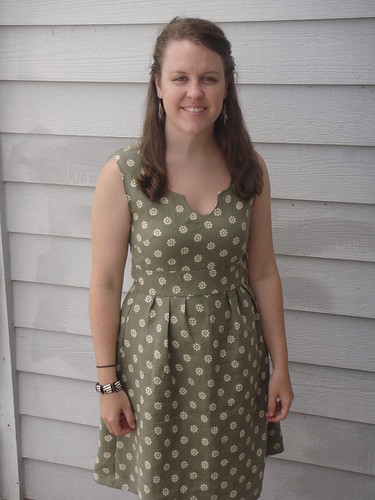
So I cut out the pattern pieces for a size Medium, as that is what best matched my bust measurements. But as you'll notice, I made some significant changes. I wanted to make the dress for a wedding I'm attending next month, and I wanted to use 2 yds of a linen-rayon blend that I bought months ago. I thought that the shirring on the back, while a fantastic aspect of the pattern, would make the dress more casual than I wanted. So I decided to omit the shirring and instead add an invisible zipper on the side seam.

What do you need to do to the pattern to accomplish this?
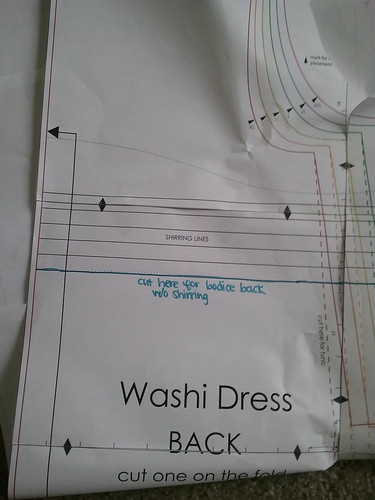

Cut the back piece as a separate bodice and a skirt. Cut the back bodice at the bottom shirring line. Follow the rest of the markings. I cut the front skirt out again for the back piece...because there's no shirring in the back of mine, I wanted to have the pleats in the back for extra shaping. Make sure that your new back skirt piece is as wide as the back bodice piece, or adjust accordingly. I had to remove one pleat from each side in order to achieve the right width. To clarify, I did not pleat the outermost set of pleat markings on each side of the back skirt.
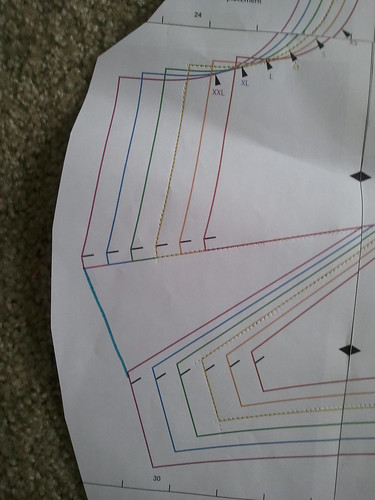

Follow Rae's instructions to make the front of the dress. I also altered the pattern instructions a bit by not cutting into the bodice for the bust darts [see picture of the seams further in the post]. This means that I didn't have to finish the edges of the darts, and it doesn't affect how the bodice lays on my body at all. I also didn't add pockets, because I don't tend to use them in nicer dresses. To omit the pockets you just follow the dotted line down the side of the skirt piece that marks the tunic sides when tracing on your fabric, and just extend it all the way to the bottom.
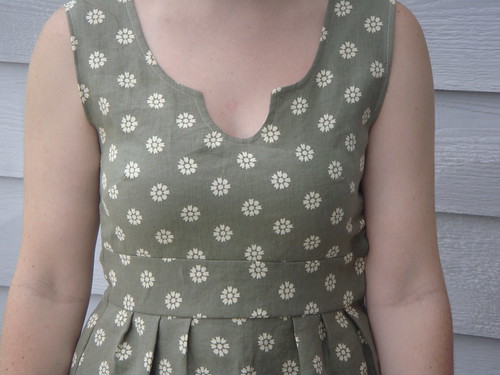

After I held my pattern pieces up to myself I realized that I didn't like where the bodice hit on me. It hit right under the bustline, and I would have wanted to lower it by an inch or two so it hit more at my natural waistline. However, I had already cut all my pattern pieces. I solved my problem by adding a waistband. I simply cut two strips that were 3.5" wide by the length of both the front and back bodice. I sewed those to both bodice pieces before I continued making the dress.

In order to add the invisible zipper you will simply sew the shoulder seams first, then add the zipper to whichever size you prefer. I sewed the zipper up to approximately 1/2" away from the armhole so that I could finish the armholes properly. Then add a hook-and-eye closure at the very top.


I should have known that everything was going so well that the zipper would be a fiasco, and it sooooo was. I'm actually a pro at installing invisible zippers by now, but you know what I did not once, but TWICE? I pulled the zipper pull off the teeth after sewing the zipper to the dress. I don't think I've ever cursed that much in my entire life. Sailors would have blushed had they heard. Good thing I had 3 zippers on hand...


I chose to finish all the seams I could as French seams, so the inside is the cleanest garment that I've ever made. Woo! You'll notice the seams are pretty wide. I had to remove almost 4 inches from each side of the dress [I didn't make a muslin; I just fitted as I went] and almost 3 inches from the hem [I'm almost 5"3] so I made the side seams wider and the hem deep so that I could have a little wiggle room if necessary. So next time I think I'd make a medium bodice and a small skirt.

My favorite things about the pattern? The different colors for the different sizes on the pattern is fantastic. Seriously, so helpful! I also enjoyed learning how to make a placket, and it came out really nicely for me! Rae gives a few different options for finishing parts of the project, which is also awesome, because I don't really want to hand-sew on garments if I can avoid it.
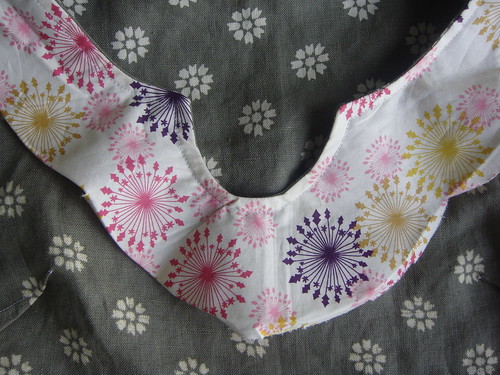

Things I didn't enjoy about the pattern? It's pretty vague when discussing understitching the placket to the bodice. I have absolutely no idea what that means, and the pattern didn't give me any clues at all. As a result, my placket is still wiggling free until I figure out what to do with it.
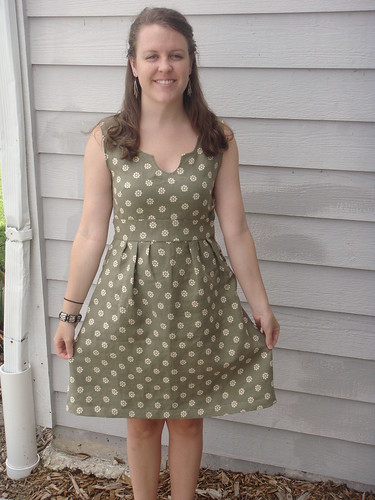

My final verdict? Great pattern that has the ability to be adapted to make several different items. Totally worth the price. So go get it! I'll be making a tunic version next :) This time with shirring!

Saturday, August 4, 2012

Sartorial Saturday - The Easy Tank Top

I realized earlier this week that I haven't sewn any clothes in a long time. I think it's been all summer. I've just been so busy with various quilting obligations, plus preparing all the Potter Patterns for release next week, that apparel has fallen by the wayside.

But despite the fact that I'm not too awesome at making clothes, I really enjoy it. So when I woke up this morning and saw that it was monsooning outside, I decided I'd spend a few hours making some clothes.

I have two projects, but figured I'd show you the tank top today and save the other [with lace! and more successful!] for another day.

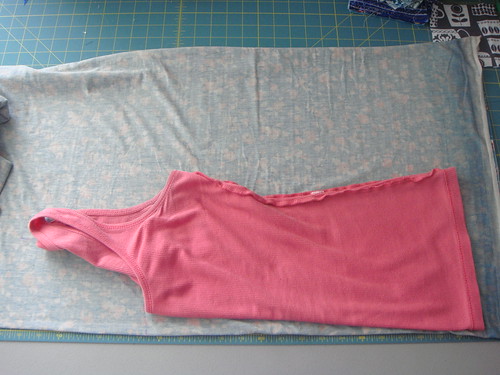
I simple traced the shape of a tank top that I like:


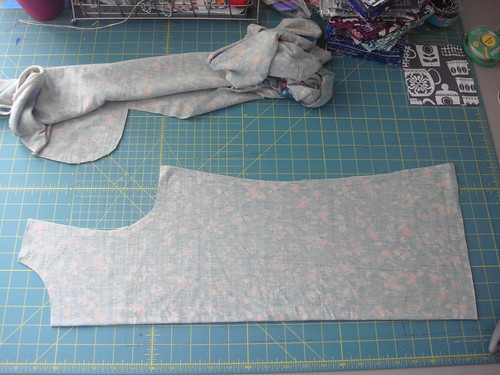
Added in seam allowances:


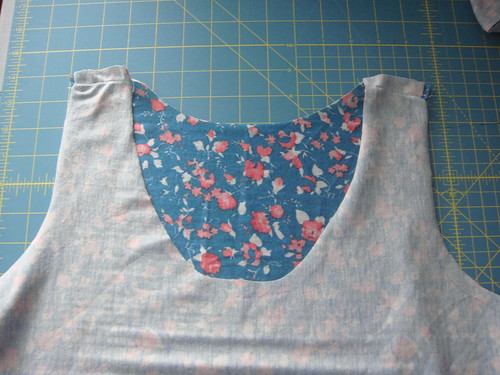
Put right sides together and sew first at the shoulder seams, then along the side seams. The fabric I'm using is a knit, so it doesn't fray, but I'll still probably use pinking shears on the seams.


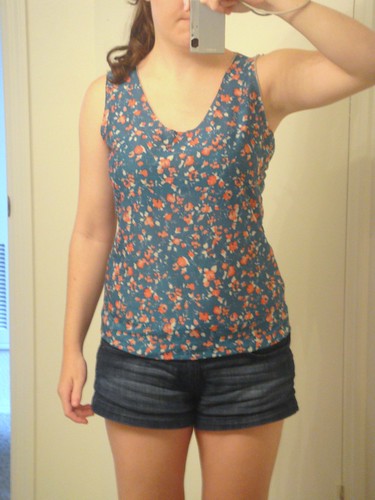
So here's where things get a little iffy...Both the fabric I'm using and the tank top I traced are knit fabrics. But the tank top is stretchier than the new fabric, which I knew. So I made sure to wear said tank top yesterday so it would stretch out, thus giving me a slightly bigger tank top to trace.


Based on me trying it on, I'd say that I actually need 1/4" more on each side. It's a little snug across the bosoms and around the hips. So now I don't know whether to finish the neckline and armholes or throw it in the trash and call it a day? I bought the fabric on clearance for like $5, so it wouldn't be a huge loss...


I never have these kinds of problems with quilting!


Saturday, June 9, 2012

Sartorial Saturday: Nautical Striped Skirt

I'm a fickle, fickle clothing maker.

I have half-made garments floating around my home. I have a pretty impressive stack of apparel fabrics from lace to gauze to linen to knits. I want to buy indie clothing patterns left and right. So I made myself a deal...I have to use up about half of my apparel fabrics on patterns that I own before I'm allowed to buy more fabric or more patterns.


So Thursday night I made a skirt! It's 100% Pima cotton too! Cue angel music.

Now, unfortunately, I didn't measure too much while I was doing this. I simply held the original fabric length up to me, saw that it was more than enough to get around my hips, and decided that I would just gather it all to the waistband. So I cut the length in half, then cut one of the pieces in half again. I cut a long strip off the bottom to serve as my waistband [which I did measure].

I sewed all 3 pieces together to create a really really long piece. I was very, very careful to match all the stripes, and I did pretty well!

I used interfacing on the front side of the waistband to give it structure and support to hold up the rest of the skirt. It will also keep the waistband from wrinkling while wearing.

To gather that long piece to the size of the waistband, first I noted in the waistband where the center and side seams should fall so that I could try to gather the fabric evenly. Then I sewed 2 lines at the top of my skirt piece, making the tension as loose as possible and the stitch length as long as possible. Then I grabbed the bottom threads and pulled carefully [you don't want to snap the threads!], sliding the gathers along the skirt to even them out as best as possible.

I don't have any pictures of the next step because I was very intent on my task, but I put the skirt piece up inside the waistband, matching the center up first, and then the sides. I used a TON of pins, and just made sure that the gathering stitches were hidden by the waistband.


Invisible zippers give me cold sweats. But I grabbed my liquid courage [a glass of wine] and forged on. It needs improvement. More skirts!


A hand-sewn hook and eye closure keeps the waistband from gaping at the top where the zipper ends. You can see at the top there I also tacked down the seam allowance so it wouldn't fold over on itself there. I'm still trying to figure out a better solution for that, but this works for now.


The innards! French seams for the sides, the zipper seams are cut with pinking shears, and the hemline holds the side seams towards the back of the skirt.

So twirly!
 And, for your Saturday viewing pleasure, some photo shoot outtakes:

Me: Will you come outside and take pictures of me in my skirt for the blog?
Stephen: Can't I just take the pictures in here? Look, this one's nice.

Stephen: So after these pictures we should take a picture of you vacuuming in that skirt.
Me: What? Why?
Stephen: It's like big...and floofy...and something June Cleaver would wear. She vacuumed a lot, right?

Me: Are you kidding me?
Stephen: Well that's not a pretty face for the camera.

Happy Saturday! :)

Saturday, June 2, 2012

Sartorial Saturday: Pattern Runway Gathered Sundress

Happy Sartorial Saturday!

I finally managed to get some pictures of the bodice muslins I made for the Pattern Runway Gathered Sundress that I made [don't worry, you'll get to see the finished product in good time!]. I don't know how people who live alone manage to blog about sewing clothing for themselves, because I had to take these pictures myself and it was quite difficult.

I ended up having to kneel by a window for the best lighting and place to set my camera, so I don't think my posture is as accurate as if I'd been standing, but this is close enough.

The white bodice on the left was my first muslin, cut at a size Small. According to the measurements given in the pattern, I should have been a small. But look at how baggy it is! Not attractive in the slightest. Not to mention that it's way too long for my torso. The waistband was hitting at my hips [I'm wearing an A-line cotton skirt to mimic the gathers of the skirt of the dress when it gets added...but it does make my waistline thicker than it is normally, so that puts strain on the waistband that wouldn't normally be there].

So I said "Hm." And then I cut an XS. Sort of gratifying, I guess. And you know what...I made the second muslin in blue, purely because I ran out of white muslin, and the blue is some crappy fabric that I inherited that I could care less about. And having the two muslins be different colors has been so helpful! Ah, happy accidents.

Even those who are not well-versed in apparel fitting [aka me] can see that the second bodice fits much better. The neckline is smooth, there is less puckering at the bust, and the waistband sits higher. This bodice uses princess seams for a flattering fit, which I think is great, but as I was trying to decide on the fitting of the bodice, I googled the hell out of princess seams, and didn't find much. I was looking for a resource to tell me if the seam line was supposed to hit at the apex of the bust, or on the outside curve. Kind of like how you don't want your bust dart to end at the center of your bust, or else you get unflattering points. So I ended up looking at so many images of princess-seamed tops, and after basically staring at hundreds of boobs I decided that bodice #2 princess seams were good to go.

I also shortened the bodice by an inch by cutting at the line indicated on the pattern pieces. It was very straight-forward and helpful to have that line to indicate where to lengthen or shorten the bodice. The pattern instructions also included helpful information on those alterations.

My fashion fabric is some silky polyester blend that almost runs away when you sew with it. It feels extremely slippery, but has actually been better to work with then some rayon blends that I've used.

And really, who doesn't need a black and white polka-dotted dress?!

Have you been making summer clothes?! If you have, leave a link in the comments! And if you haven't then I'll be your cheerleader!


Saturday, April 21, 2012

Sartorial Saturday: The Ruffle Edition

I didn't finish my dress from last week. In fact, I haven't even fixed the bodice yet. My week was full of other things.

But I have something else!


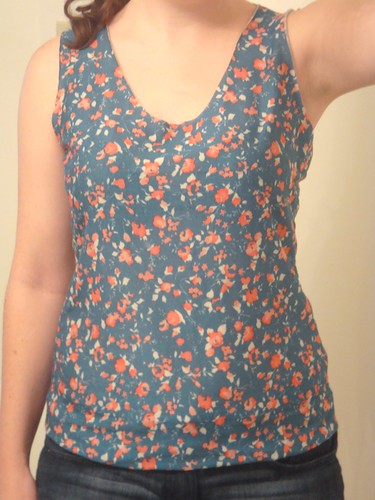
Thursday night I couldn't sleep, and so I grabbed a yard of coral knit, and made some magic happen.


I used a top that I own and had the neckline that I liked [although it isn't a tank top], and I used it to cut out the pieces for a tank. I really only used the curves of the armholes, because I lowered both the front and back neckline, changed the shape of the sides, and lengthened the hem. But it was a launching point.

My machine really didn't like this knit because it was so thin and stretchy, so I laid some paper over top as I stitched, and it did just fine. I'm all about the tricks!

Now, let me tell you, this thing is comfortable. It was tempting to just leave it like that and wear it around the house when I'm being a bum. And I might make another one for that purpose.


But then I decided I'd add a peplum-type feature. Is it still a peplum when it's in a knit? Anyways, I know that many people would have cut their shirt where they wanted the elastic to go, and then sewn the elastic into a casing. However, I'm all about the shortcuts, so I just folded my shirt up [right sides together] where I wanted the elastic to go, and sewed a 1/2" seam. To get the elastic the right size, I placed it around myself where I wanted it to sit, just comfortably, and then took off about 2" off that length. Add a safety pin to the end to feed it through the casing that was just made, and I was all set! By the way, I just cut a hole into the side seam to feed the elastic. I didn't stitch it up because the knit won't fray, but if you use another material you will then have to stitch your hole back together.

I can't get this to not be sideways for some reason

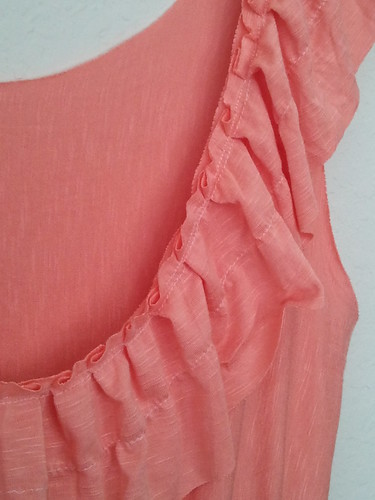
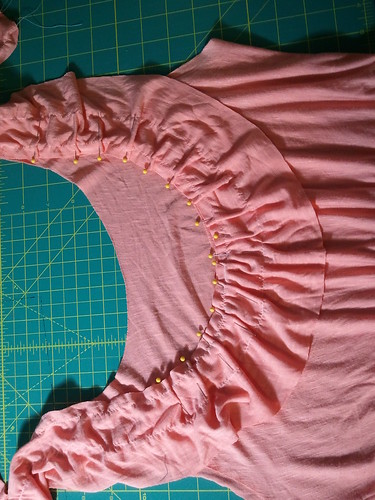
To make the ruffles I cut a piece at 3.5" and stitched 2 lines about an inch apart. I wanted a light ruffle at those locations. To make the overall ruffle, I made little pleats at the neckline as I added the strip. This required patience, and lots of pins! And in fact, after I took that photo I noticed that the strip was on backwards [there is a slight texture/print to the knit] and so I had to re-do it! That's what I get for doing this at 2 am.


Voila! A shirt! Comfortable and cute. And it cost about $10, which was the price of the fabric. Everything else I had on hand. I think I'm going to call this a win :)


Maybe people would be interested in me walking through the details with more pictures so you can make your own shirt? Holler if you'd like that :)


Saturday, April 14, 2012

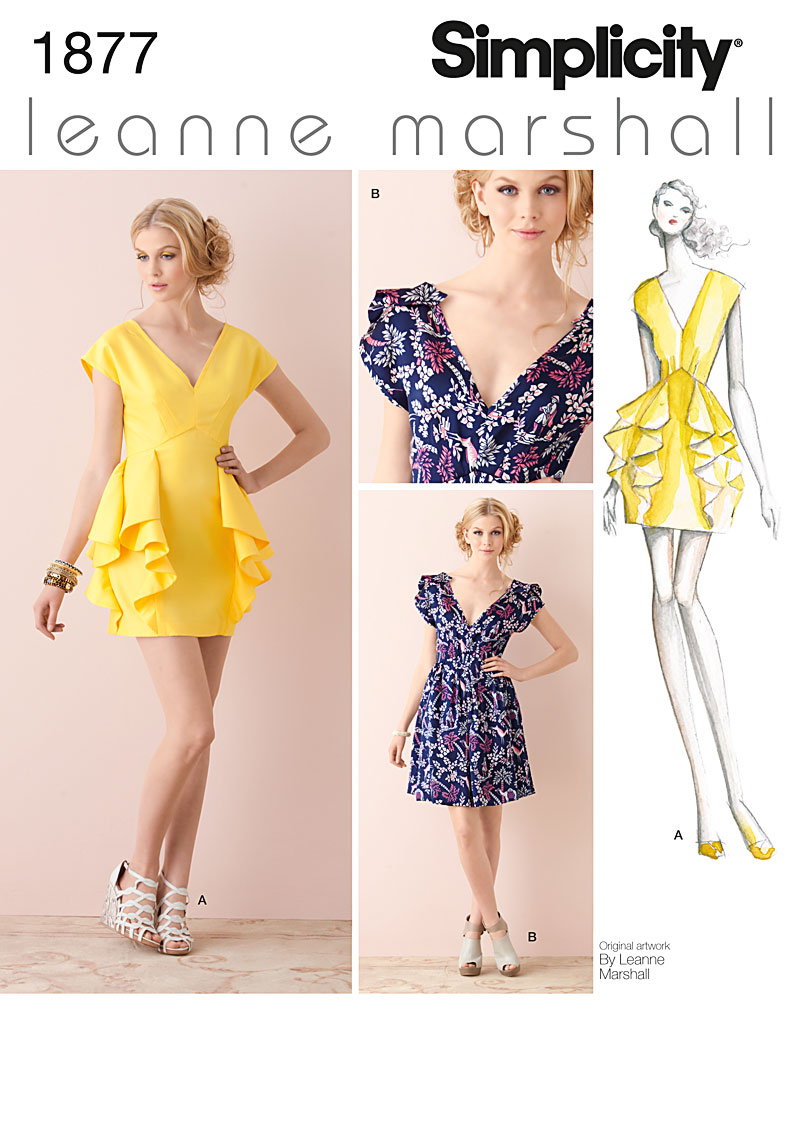
Sartorial Saturday: Simplicity 1877

First of all, let me just share some exciting news. A few weeks ago I had a card for a free pair of underwear at Victoria's Secret. So off I went. And it happened to be during the 7 for $25 sale, which is a deal I just couldn't pass up. Then they were giving rewards cards with your purchase that have the surprise amount on them until the following month, but all of them are worth at least $10. Well I never thought they ever had any other amount on them.
Except yesterday I found my card on the floor of my bedroom almost under the bed.
And checked it online.
It has $100 on it.
I KNOW, RIGHT?!! Where is all this good luck coming from?!


Anyways, undergarments aside, this week I worked on my first new pattern, a Leanne Marshall dress [the blue version, not the horrid ruffly/flouncy thing].

I must be getting more patient in my old age because I actually made a muslin of the bodice. I knew I wanted it out of this fabulous Carolina chambray I had, and I didn't want to waste it!

Apologies for the absolutely terrible photos in this post, all were taken at night on a cell phone because my camera is dead and I've been doing lots of nighttime sewing.

 Now, this was just a very rough attempt, since I really just wanted to make sure I was cutting the right size. And it was really easy to sew up. A total of 4 pieces in the bodice, and 6 darts total. I thought this fit really well with the exception of the shoulders. It might be hard to tell in the photo, but you can sort of see the exposed shoulder above has the fabric just sitting above it, instead of resting on the shoulder. I figured I would just take up the shoulder seams a bit, and that would also help the bust darts lay a bit higher [and maybe raise the neckline a bit...scandalous!]

So I made the bodice up the other night in the chambray. Now, this photo is taken at a slight upward angle, so it's a little different perspective from the muslin photo. I did take up the seams and you can see the difference that it made. But I think this went too far, and that I need a fit more in between the two. I also really don't like the sleeves on me, so I might just make it sleeveless.

But seriously, look at all those encased seams. Not a raw or zig-zagged edge to be found. It's positively beautiful on the inside. I even tied the bust darts at the end instead of back-stitching so that I wouldn't get pointy bits.

I cut out all the pieces for the rest of the dress, and hope to work on it tomorrow! Is anyone making clothes right now too?

Saturday, April 7, 2012

Sartorial Saturday: The Inaugural Edition

Merriam-Webster defines sartorial as relating to a tailor or tailored clothes; broadly relating to clothes.

Now, I am not being so generous with my apparel sewing as to say that my handmade items are 'tailored', but "Sartorial Saturday" does have a nice ring to it, and the blog needed a little organization to handle this new type of sewing. Plus, don't you feel smarter just thinking about the word sartorial? Henceforth, Saturdays will be all about my apparel sewing, leaving anyone not interested to completely blow past me in their Reader over the weekend.

*Let's just take a moment to appreciate the fact that I used both sartorial and henceforth in one paragraph. And people say higher education is a sham. Pfft.*

Back to clothing!

To start this thing off right, I noted that Joann's was having a Simplicity pattern sale this weekend, and stocked up on 5 patterns that I've been interested in. At $2 each, I felt pretty secure in buying them, even if they're a flop.

Without further ado [do you see a theme here today? We're being fancy]...

 Coral jersey knit and a plan to make View D. Without the gaudy rhinestones. In fact, I think it's really hard to see the potential in this pattern, and wouldn't have bought it if I hadn't seen a version somewhere on the Internet with some nice fabric and no embellishments.

 Two rayon jersey blends. Sidebar: I LOVE polka dot clothing. The pattern is actually not made for stretch fabrics, although it totally looks like a jersey dress. But I'm going to make a muslin to see how the fit is, and then make a sleeveless version. Making it with a knit will eliminate the need for a zipper yay! And um, if I have enough pink left over, I might make pajamas...seriously...the fabric feels so nice...is it ok to have a dress and pajamas made out of the same fabric? Hmm.

Linen-rayon blend and a Carolina chambray. The rayon makes the linen feel a little silkier and drape nicely, and as I had hoped, it also helps it from wrinkling. Hallelujah. I'm leaning towards making the Lisette dress in the chambray, but who knows. I'm wild. Sort of. As much as you can be when you're a beginner at sewing clothes.

See you next Saturday with my first completed piece! :)