Showing posts with label FMQ. Show all posts

Wednesday, August 22, 2012

Kittens and quilting do not mix


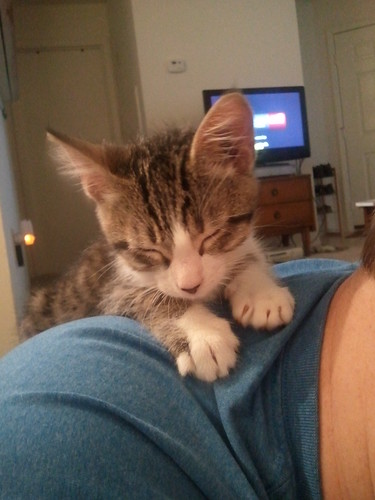
So I've had a kitten [which we named Ares, kitten of war!] for just about 24 hours.

It's hard to sit on the couch and read blogs when your kitten wants to play. All.the.time.


Even harder is figuring out when I'm going to sew! We took him in the sewing/airsoft room and let him wander around yesterday, but there's so many small things and spaces he can climb into that we keep the door closed for now until he mellows out.

I'm not sure that I can sew and keep an eye on where he's wandering to in the room [those of you who sew with tiny children underfoot are clearly amazing].


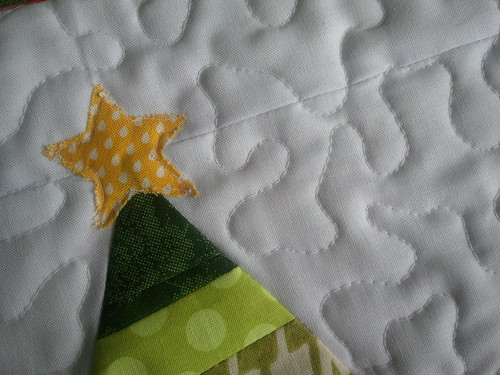
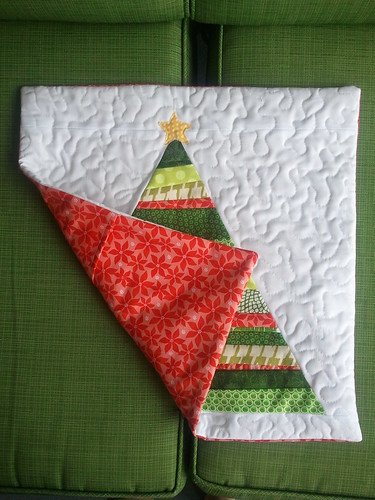
I managed to piece this pillow top on Monday night since I figured I'd be too busy on Tuesday after picking Ares up at the vet. I woke up early this morning to sneak into the sewing room to quilt and finish it with an envelope closure. I would work for 10-15 minutes and then go play with Ares. It took a little bit longer to finish that way, but then I didn't feel bad for not giving him enough interaction.


This pillow cover is destined for The Sewing Studio, which is the store I teach at, for a class in September. It's based off the pillow by Kati over at From the Blue Chair, although I don't use her tutorial whenever I make one. And mine is not paper pieced, because that just seems to make things a little more complicated than needed.


I also like my original version [above] better, so apparently I'm more a fan of a skinny tree?

I'd like to get a bunch of DWR arcs sewn up today, because Jennifer is making me look super bad with all her progress. I cannot find my 8 arcs after we did a huge cleaning and kitten-proofed the apartment...I'm a little concerned Stephen might have thrown them out, thinking they were some sort of scrap project with the paper still on the back of them. Eeek!

Here's to hoping the kitten allows it!

Monday, August 20, 2012

The Evolution of a Queen-Sized Quilt

A queen-sized quilt? What was I thinking?! Only for Kelly...


Kelly has been my best friend since sophomore year of high school. We were just people who went to school together and had classes together until then, but we slowly realized that we both loved crossword puzzles [and were consequently the coolest of people]. We were still just sort of friends when she invited me to NYC over Spring Break with her and her mom. She wanted me to go so she wouldn't be alone with her mom for 5 days, and I wanted to go because her mom said she'd pay for everything but the plane ticket. Best decision ever. We spent 5 days touring art museums and cemented our friendship over coffee, puzzles, and the ability to pack for a vacation in just a Jansport backpack.


College came around and she went to MIT, while I stayed in Florida at UF. She came home once a year and I visited her twice up there. I spent summers working and she spent them in places like Sierra Leone, India, and Singapore doing internships for her architecture program. I hope you can tell by now that she's super awesome?

Last year when she graduated from MIT she decided to go to grad school at Berkeley for urban planning, so now she lives out in CA, and we still only get to see each other for about a week a year. Plane tickets to CA are pretty hefty, so I haven't gotten to visit her yet. Whenever she comes home I clear my schedule and try to spend as much time as possible with her.

At Christmas she mentioned how much she liked Stephen's simple patchwork quilt and sort of asked for one. Then later in the spring she said she wanted to pay me to make one, but felt weird paying me, so she'd send me presents in exchange for a quilt. I said sure, and got started collecting fabrics. And then in April she mentioned she wanted to use it on her new queen-sized bed.

And I stalled. Feeling very unsure of tackling a queen-size quilt.

But for Kelly...


This quilt is made up of 510 five inch charms. It measured about 95x108" before washing. Stephen is oh-so-nicely holding it up when it's damp, because I plum ran out of time for it to finish drying before I had to meet Kelly. Which is why all these pictures are just "meh". Hopefully the quilt crinkles more!


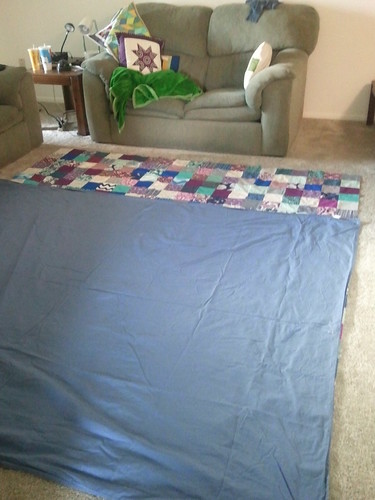
Many people expressed interest in what I ended up doing for basting. I had to move all my furniture as far back as possible in my living room in order to accomplish this. I've tried taping the backing to the carpet as you would for hardwood floor basting, and it does not work for me. So I lay the batting out on the floor, then spray baste each side to it individually. This time I tried pinning the batting pieces into the carpet so that it would remain taut...it didn't work exactly how I'd imagined it would, but maybe that was just user error.


Apologies for the picture, but this was an afterthought as I was running out the door. There was no way in hell I was going to piece a backing after piecing the top, so I pulled out a queen-sized flat sheet I had on hand. Too small. I had to run out and get a king-sized sheet, and it was juuust big enough.


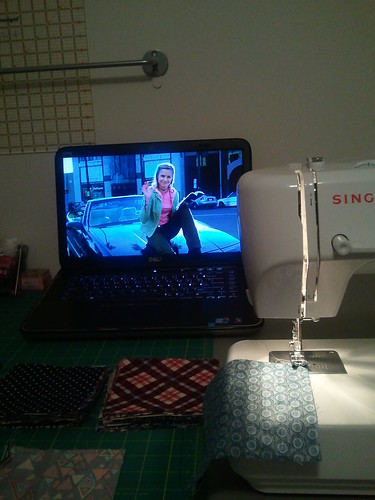
How long did this whole quilt take me? Well, I sewed the first 28 [out of 56] nine-patches, and then I was SO BORED. So I pulled out my computer and Season 1 of Veronica Mars. Kelly and I LOVE this show. Love. Spunky female detective played by Kristen Bell? Yes please. Watch it, love it, thank me later. I watched the entire first season [22 episodes at 45 min per episode] while piecing the rest of the top together and quilting it. I had to bind it without any TV distractions. So I would say the whole thing took about 25 hours to piece, quilt, and bind.


The picture above shows a few things: 1, the quilt is clearly still wet, so I hope it ends up looking better from the back when it's dry, and 2, that it's fairly lightly quilted and looks like it could be basted better. I can't wait for the day when I'm a professional baster and those quilts are as flat and smooth as can be.


Because this quilt was a beast, I knew I wouldn't be able to quilt it as much as I might normally quilt. So I put some straight-lines down the quilt every 4 rows, following the seam lines. Then I added some free-motion flowers using the squares to help guide me. I quilted a single petal in each square. Every other row I alternated where the flowers started so that they would be staggered on the back of the quilt. The flower part of the quilting actually went really smoothly...during the straight-line part I could feel my soul shriveling up inside. Ha!


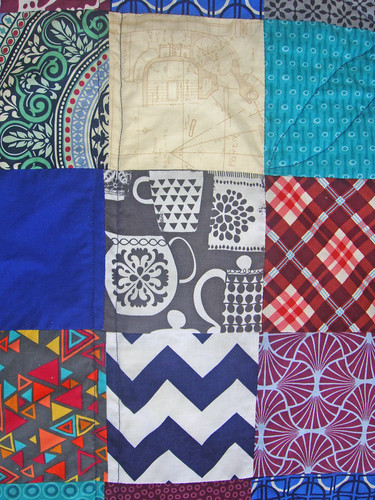
There are a few special fabrics in this quilt just for Kelly: the Children at Play rocket print that she loved from Stephen's quilt and is a nod to the smarties at MIT, the Etchings blueprint fabric for her architecture degrees, and the gray Michael Miller Catherineholm enamelware print to celebrate our obsession with coffee at any time.


It was certainly tough to make this quilt this huge, and it may not have turned out as awesome as I wanted it to be, and I may have cursed at the air quite a few times during the process, but I would absolutely do it all over again for seeing the appreciation on Kelly's face when I dropped it in her lap :)

Oh, and then as my last present in exchange for the quilt she gave me Adobe Creative Suite, which has Illustrator and InDesign and is super expensive. She gets it on the cheaps through her architecture program. As soon as I learn how to use it all you can expect some exciting things!

Thursday, August 16, 2012

"Sendin' out an SOS..."

*This post is brought to you by the song 'Message in a Bottle' by the Police. Rock on.


This quilt may look small and cute, my friends, but I took this photo from the 2nd story. That behemoth is 95"x108". I need a kitten for scale. Please feel free to give me a kitten for this purpose. And for cuddles.

So how do I quilt it?! And no, not what design do I quilt on it? I mean literally, HOW do I quilt it. My machine has a whopping 5.5" of throat space. I'm no math whiz, but I do realize that 5.5 and 95 are not the most compatible of numbers.

Things are about to get reaaaaal creative around here.

[Spoiler alert: I've already started quilting it. I've only torn out one chunk of hair so far. And there's only been one major pucker. I need to learn the secrets to perfect basting...did you hear that basting gods?!]

**PS, thanks for all the super nice words about my Winterkist gnoma advent calendar. You guys rock.

Wednesday, August 15, 2012

Winterkist Blog Hop - Gnoma Advent Calendar


When Katie asked if I wanted to be part of the Winterkist blog hop I said yes in about 0.2 seconds. And then in about 0.5 seconds I knew what I was going to make.

Even though I knew what I was going to make, I wanted to ensure that anything with Winterkist was made in the epically fun spirit of its designer. So I thought to myself: WWMSSD? That's What Would Monica Solorio-Snow Do? for those of you who are behind the times :) Monica's a pretty fun and hilarious lady, so I tried to rise to her level - this is me channeling my inner Monica.

I gathered myself a gnoma and we set out into the world, Flat Stanley style. I took the Prince Harry of gnomas, because he's not directly next in line for the throne, so he's allowed to engage in shenanigans and go out and rabble-rouse, whereas poor Prince William gnoma had to sit at home waiting for his moment to shine in the project. What did Prince Harry Gnoma and I do on our day of fun? Take a look:

1. Buckle up, Gnoma, safety first! 2. We had to get gas, and he pumped it [it builds character] 3. He was thirsty, so we had to stop for a Coke 4. Prince Harry Gnoma's favorite artists are ABBA, Tracy Chapman, and Tenacious D, in no particular order 5. Kelly and I buried him in the sand at the beach 6. I told you Prince Harry Gnoma was all about the shenanigans...wonder where he got all that cash money?! 7. Went hiking and had a zen moment at the top 8. Practiced the art of seduction with a mustache

By the end of the day, we were tired, but ready to get to work!

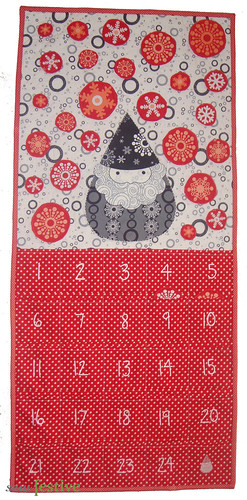
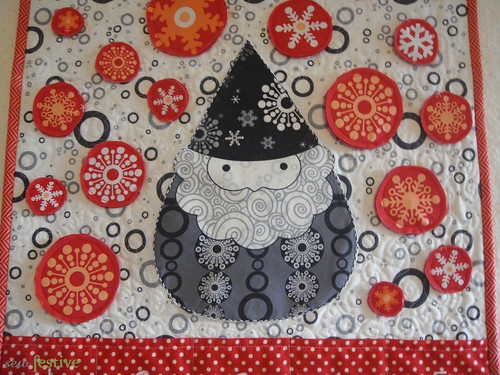
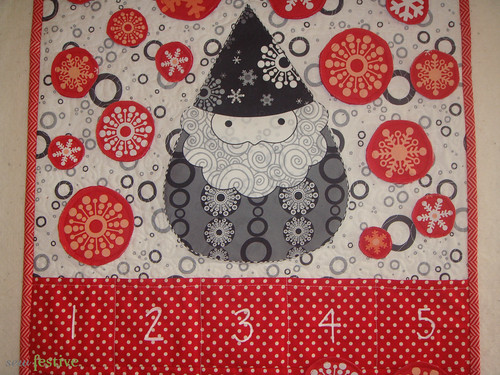
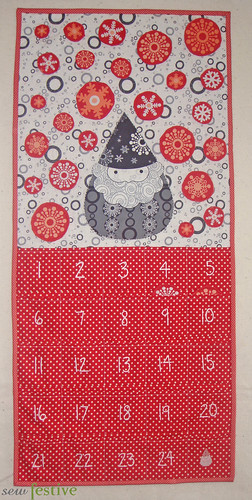
A Winterkist advent calendar! When I was growing up we had a Christmas tree advent calendar and you hung an ornament up for every day. I loved doing that [still do] and so I really wanted to be able to physically move something for each day to countdown to Christmas.

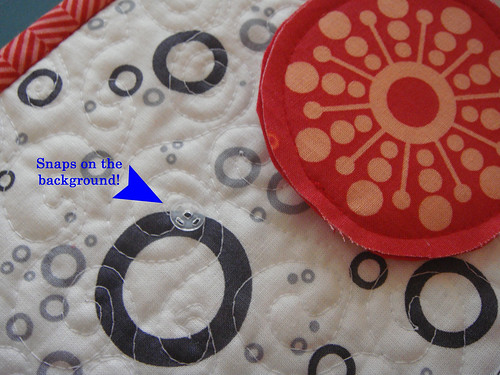
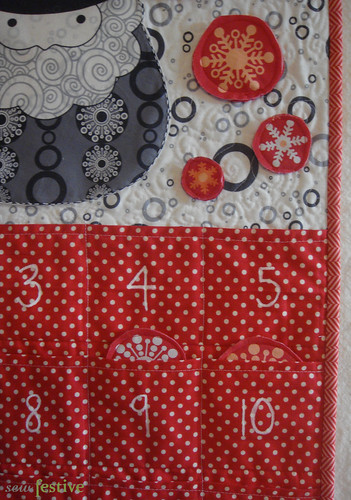
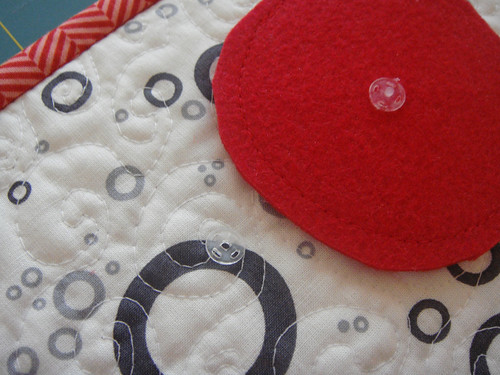
So to count down each day closer to Christmas you get to take a snowflake from the pocket [the snowflakes slide in more, I just wanted them to be seen for the picture] and snap it up around Prince William Gnoma. The snaps that are on the calendar itself are very hard to see since they're clear, so when none of the snowflakes are snapped on then it still looks great!


I Steam-a-Seamed the largest gnoma in the collection to the background and then stitched in DMC Perle 8 around the edges. The only thing I'd do differently next time is layer some white fabric behind the gnoma so you can't see the background when it's stitched down. I kind of think it looks like freckles?


The snowflakes are interfaced and then stitched to some heavy duty red felt for durability.


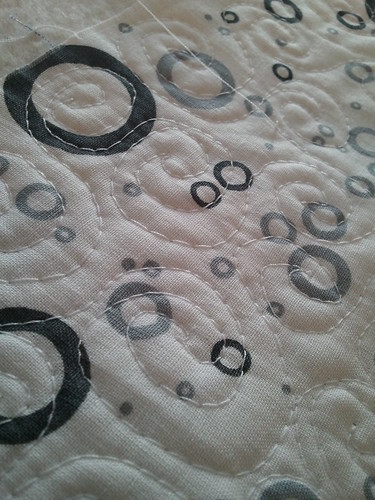
The white background [which is also Winterkist] is free-motion quilted in a new-to-me design. Swirls! Hopefully so it looks windy/snowy/blustery. I don't have the patience for practice, so this was my first try at this design, and I'm pretty darned pleased.

Winterkist pairs up so nicely with this red Farm Fresh dot for the pockets, and the Riley Blake [I forget the line] for binding, and some fabric marker drawn numbers to indicate the day. In all honesty, I'd originally planned to embroider the numbers, but wanted nothing to do with more hand-work when I was sewing this all together.

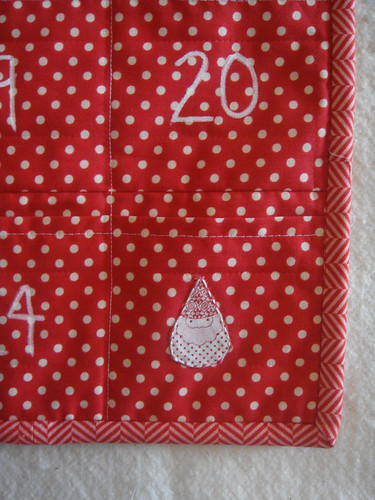
AND LOOK. Baby gnoma! From Holiday Happy! For the 25th :)


I love it! I love that it's on the bigger side [about 18" by almost 36"] so it will take a commanding space in my living room this winter. And I love that it's not "Christmassy" and so I can leave it up in January and February and June. The pockets are plenty big enough [3.5" square] to hold the snowflakes and even a little treat or note.

I plan to sew some snaps onto some double fold binding or some ribbon so that I can use the snowflakes as a garland in January if I want. You could totally do that with the gnoma too, I just didn't think of it until I had already sewn him down.

Thanks Katie for letting me join the fun, and for Monica for having gnoma fun with fabric!

Don't forget that if you leave a comment on this post, or any other blog hop post this week, that you get entered to win a FQ bundle of your choice from The Fat Quarter Shop!

The remaining blog stops:

Aug 16  Diane at from blank pages
Aug 17  Allegory at {sew} Allegorical

Aug 20  Kim at My Go-Go Life
Aug 22 Jennifer at Ellison Lane Quilts
Aug 23 Jenelle at Echinops & Aster
Aug 24  Katie at There & Back


Wednesday, July 11, 2012

TGIW and a winner!

TGIW folks! I realize that not too many people get excited about Wednesday, but I've had a pretty bad week so far, starting with a nail in my 2-week old tire that I had to drive an hour home on back roads at 1 am [by myself]. But hey, when you start the week off like that then things can only pick up, right?

And it's definitely good for one of you...
The winner of the JOY charm pack from Urban Stitches is Robyn! Remember, she's hosting a huge Christmas fabric swap right now if you're interested. I know she's making a quilt and hoping to have all different fabrics, so hopefully this charm pack helps in that goal! 

And for those that didn't win, remember that you can use the coupon code SewFestive10 at the Urban Stitches shop until the end of July! Thanks Anna :)

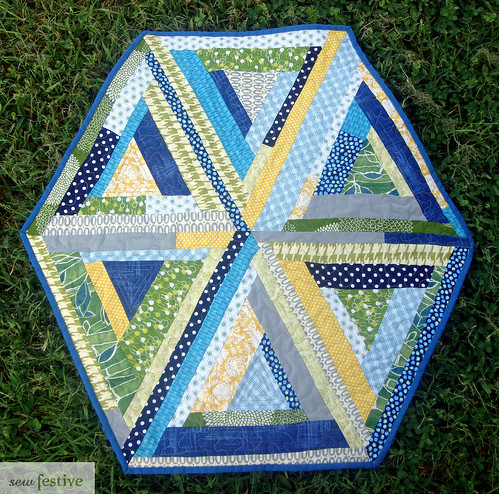
As for me, I finished up this triangle log cabin table topper last week:

I had already made the top and just needed to quilt and bind it and get it to the store so they can hang it up. The class starts August 2nd, so I needed to get going!

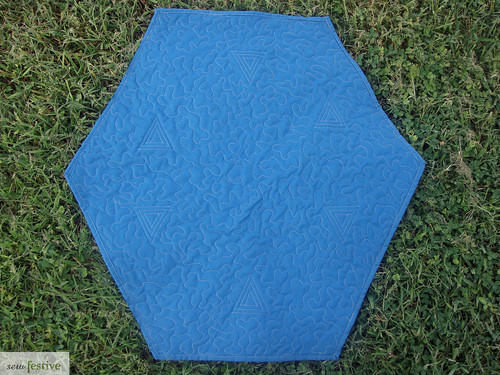
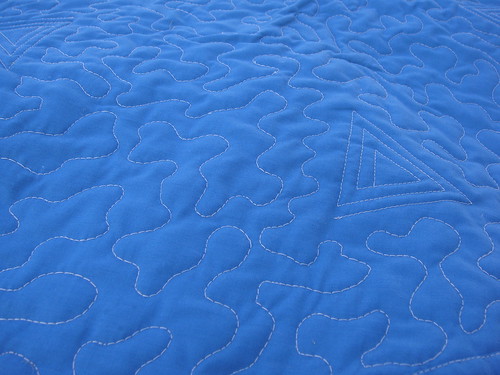
If I'd had time to sit and ponder the quilting for a few days I think I would have done something different. I quilted straight lines in a concentric triangle in the center of each log cabin and then I FMQed in every other area. All in a light gray thread. I think it needed something a little more geometric, but oh well.

I used a great Kona teal color for the binding and I think it really frames the whole thing well.

Tune in tomorrow as I have a tutorial for my stop on the Let's Get Acquainted Blog Hop! :)

Tuesday, July 3, 2012

Exciting news!

So how fun was the first day of Christmas in July?! Who's already working on some quilted holiday cards or a paper pieced snowflake table runner/wall hanging?! And don't forget that you can enter the giveaway on Jessica's tutorial for a chance at a JOY charm pack!

And now I have some more news!


Back in March I was hard at work in the Pillow Talk Swap, making my partner a pillow of clamshells. I decided to be brave and submitted my project idea to Fat Quarterly [which is oddly nerve-wracking even though it was just over the Internet and not face-to-face with possible rejection]. If you're not familiar with this publication, it's an e-zine run by 5 fabulous quilters, and publishes...wait for it...quarterly. Plus they do bonus editions all the time, like the one out right now, which is focused around the Fat Quarterly retreat that just happened!

So I think that some of the coolest things about Fat Quarterly is that it's online, so you get instant gratification when you want it. Plus it's only $8, and is loaded full of projects. Legit. That's like the price of one regular pattern. But you get MORE patterns. That's math I like to do, people. And even though it's online, you can preview the projects before you buy it! And they put pictures of those projects up on their Flickr. It just gets better and better, amIright?!

So anyways, all gushing aside, my project was accepted a few months ago. Yay!

I've had many people email me and ask for a pattern for the pillow, and I've had to be vague and say no. I felt terrible every time. So here you go, everyone! A pattern! For you to make your very own crazy clamshell pillow.

Issue 10 of Fat Quarterly will be released at the end of July and is all about the Olympics and pageantry and royalty and England. Specifically the theme is "Rule Britannia." I love the Olympics, and I personally know an Olympic runner [she just qualified for the London games yay! Jenny and I ran cross country together in high school and she's the world champion in the 1500 m!], so I think it's a pretty cool theme. 


I re-made the pillow in jewel tones and the pattern comes with probably more pictures then you will ever need to make the pillow cover. In fact, the pattern comes with 42 pictures. And, after sewing the 54+ curves that make up the clamshell part of the pillow, there's no way you won't be a pro. Don't let those curves scare you though, because I walk you through everything nice and easy!


Also, I love all the free-motion quilting that I did! It was so fun!

So, mark your calendars, because I'm sure this will be a super fun issue, even if my project wasn't in it. But since it is, the issue will be that much better ;)

*Linked with Quilt Story

Monday, July 2, 2012

Christmas in July - Snowflake Table Runner/Wall Hanging

Hello again all! I'm back again with the 2nd Christmas in July tutorial of the day! Make sure you go check out Jessica's quilted holiday card tutorial with a giveaway if you didn't see it earlier!

So this was my day during Christmas in July and I wanted to make sure that there was something that was festive and holiday-esque, but not necessarily "Christmas". I want everyone to play along, regardless of whether you celebrate Christmas or have an aversion to Christmas decorations! I had originally planned for this to be a pillow, but then when I had the giveaway a few weeks ago, so many people said they wanted to make table runners or wall hangings. I'm a people pleaser, so I made it happen!
 
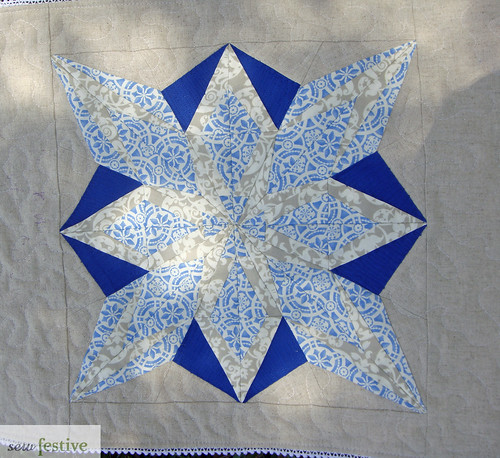
This is a paper piecing pattern that I created in EQ5. The paper piecing template can be found HERE. In downloading the pattern you agree that you will only use the pattern for personal use. You cannot sell the pattern, or items created from the pattern, without express written permission from me, Rebecca Smith.


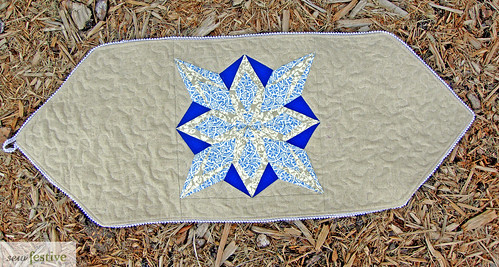
Snowflake Table Runner/Wall Hanging
Please read through entire instructions before beginning.

Materials Needed:
**Fabric amounts listed are for the same placement of different fabrics as my example; your amounts may vary, depending on where you choose to put which fabrics.
  • Four copies of the paper piecing template
  • Coloring page [optional, but recommended] found HERE
  • FQ - 1/3 yd of  3 different fabrics [you will have scraps left over]
  • 1/2 yd background fabric [you will have scraps left over]
  • 18"x38" piece of batting
  • 1/2 yd backing fabric 
  • 3 yds pom pom trim [optional; if you choose this then you don't need the ribbon]
  • Scrap of coordinating ribbon/twine [approximately 4 in long]
  • Scissors for cutting paper
  • Old rotary cutter [optional]
  • Tweezers [optional]
  • Usual quilting supplies [ie, scissors, cutting mat, ruler, etc]
*Disclaimer: I am by no means a paper piecing expert. In fact, this was the first paper piecing I've ever done [I know, right? What have I been doing with my life?]. This means two things. 1, I have tried my hardest to explain thoroughly, but this may not be the "right" way to paper piece, and 2, you can clearly do this if you've never paper pieced before, because I did! If my instructions don't work for you [we all have different learning types!] then please, take a whirl around the Internet and find some other tutorials that might click with you, and use their methods for piecing the snowflake.

Step One - Color in your blocks


I recommend doing this so you can play with the placement of colors in the various pieces, and then you know which fabrics go where when piecing. Above you can see the various iterations I went through before I settled on a color scheme.

*Note, some of the lines got messed up between exporting from EQ5 to Paint to uploading to Google Docs. So there's a missing line on the right side of the top, bottom, left, and right diamonds on the coloring page. It should be pretty obvious, and is easy to just draw in.

Step Two - Print your Templates and Set your Machine

The snowflake is created using 4 blocks, and will finish at 12.5" square. Each block prints on one page, so print 4 copies. In the area where you can choose scaling, choose NONE. To ensure that the blocks printed at the correct size, please verify that Unit A measures 3.5" along the bottom.

*These are the printing instructions for viewing and printing through Adobe Reader. I recommend that you use this program. If you don't have it, you can get it for free here.


Please note that I have written in some different numbers in Unit A and Unit C because EQ5 didn't print one of the lines for some reason [you don't have to do anything, I was just explaining the hand-written numbers on the Google Docs copy]. Cut the templates apart, but do not cut directly on the line of each template. Keep templates grouped in blocks so they do not get mixed up.

 Set your machine to a low stitch length. This perforates the paper and allows for easy tearing. It is important to backstitch at the beginning and end of each piece you stitch, or else your stitches will get ripped out when removing the paper. The needle you use will need to be replaced before quilting your project, because the paper dulls the needle more than usual sewing.

***Assume all seam allowances in pattern are 1/4" unless stated otherwise. 

Step Three - Unit A

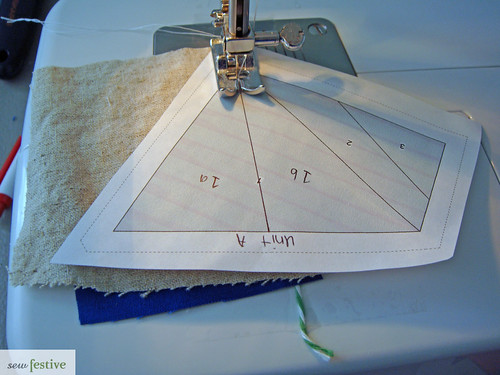
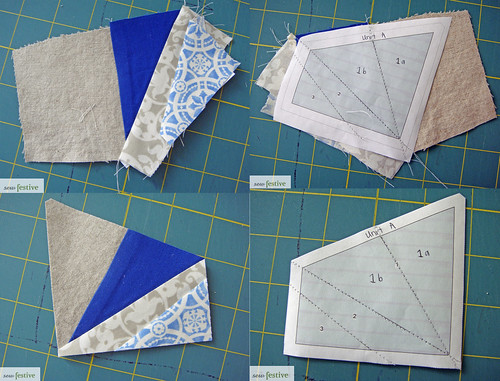
Take Unit A piece; set all others aside. The solid lines on the pattern indicate where you will be sewing. The pieces of fabric that you use must always be large enough for a quarter inch seam allowance, which is the portion of the pattern between the gray and the dotted line. I do not measure the pieces I use, I just start out with my FQs of fabric, and cut a square/rectangle that covers all the area that I need to cover. [Note: I personally use pretty large pieces of fabric because I'm less concerned about fabric waste than I am about not having a big enough piece of fabric. I assume that over time you will become more skilled at using the perfect amount of fabric. If you're really concerned you can print an extra paper piecing block and use the pieces to cut approximately 1/2" around them, thus minimizing fabric waste.]

Take fabric piece that you will be using for section 1a and place it on the back side of the paper. The paper piece should always be numbers side up, while the fabric should always be right-side down. Essentially, the two pieces should be wrong side together.

   
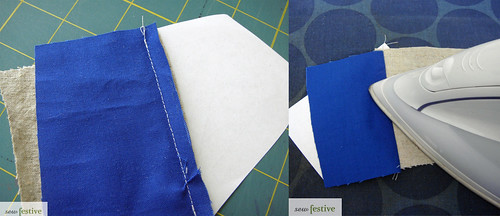
The fabric should be at least 1/4" beyond the solid line between section 1a and 1b. Take fabric piece for section 1b. Place it right side together with piece 1a. Sew along the solid line between 1a and 1b and into the seam allowances on each side.


Trim seam allowance to approximately 1/4" if necessary. Press open on fabric side.

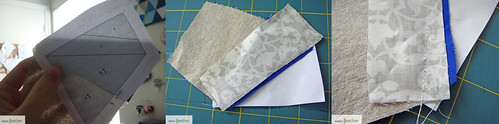
Take fabric piece that you will be using for section 2 and place it right side together with the fabric that has already been sewn, with at least 1/4" seam allowance. Sew along the solid line between section 1b and section 2 and into the seam allowances on both sides.
TIP: To ensure that you don't sew the pieces on backwards, think about it this way - You will be adding the new fabric so that only the seam allowance shows up in the area of the section you're adding to. For instance, if sewing section 2 of Unit A, the white fabric I'm using should only extend into section 2 by 1/4"-1/2". That helped me when I was thinking about how to lay the new fabric down onto what I'd already sewn.

Trim seam allowance to approximately 1/4" if necessary. Press open on fabric side.

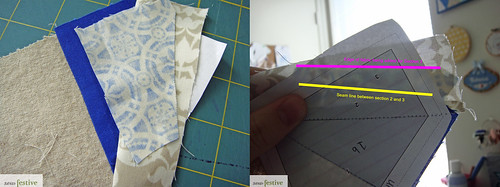
Take fabric piece that you will be using for section 3 and place it right side together with the fabric that has already been sewn. Sew along the solid line between section 2 and section 3 and into the seam allowances on each side.

Trim seam allowance to approximately 1/4" if necessary. Press open on fabric side.

Note: You do not want this to happen. It SUCKS to have to unpick tiny paper piecing stitching. If you're not sure about whether a piece of fabric will be big enough I'd recommend pinning it where it should go, and then finger pressing it back with a 1/4" seam allowance to make sure it goes all the way past the seam allowances.

You can now trim Unit A. You can certainly use scissors if you'd like [not your fabric scissors since you're going through paper!]. I personally like to use an old rotary cutter. Line the ruler up with the dotted edge and trim on all sides. Leave the paper on for now.

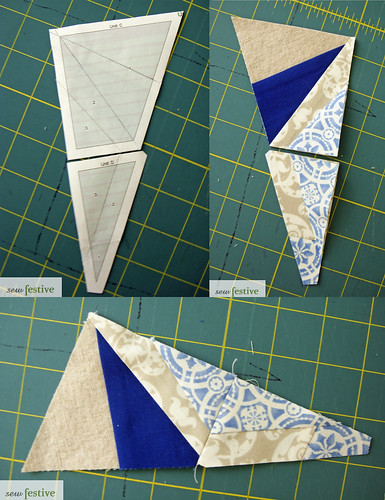
Step Four - Unit B/C/D

Follow the same paper piecing guidelines for Units B, C, and D. Units A and B are the mirror images of Units C and D, respectively. 

Step Five - Unit E & F

Follow the same paper piecing guidelines for Units E and F. These are mirror images of each other.

Step Six - Assembling the Block

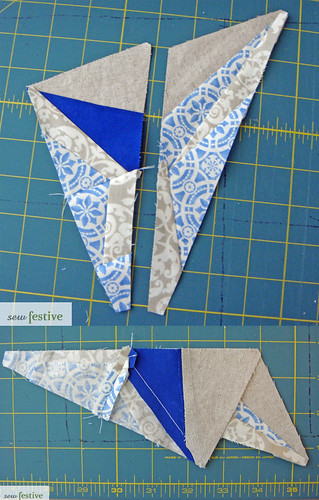
Remove paper from Unit A and B, tearing gently. I use tweezers for any paper that gets stuck at the intersection of stitching lines if my fingers cannot remove it.


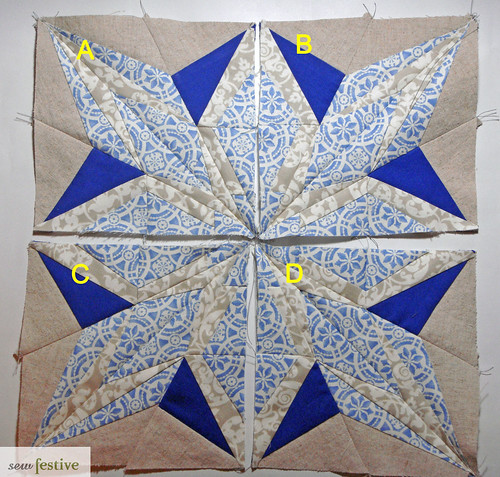
Sew Unit A and B together. Line the pieces up at the end that will become the center of the block. Press seam open.
Remove paper from Unit C and D Line the pieces up at the end that will become the center of the block. Sew together. Press seam open.

Sew Unit A/B to Unit E and sew Unit C/D to Unit F. Press all seam allowances open.

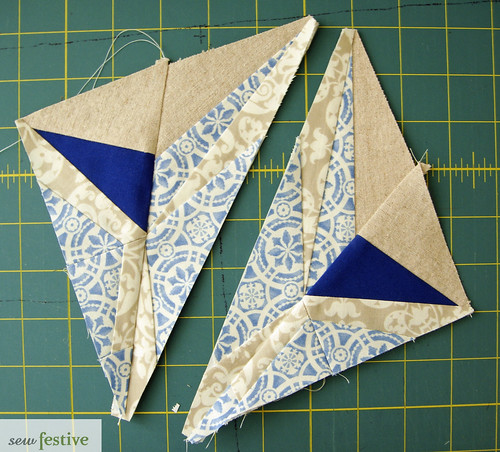
Sew Unit A/B/E to Unit C/D/F. Press seam allowance open.

Press block.

Step Seven - Make Three More Blocks

Follow steps 3-6 to create 3 more blocks.

Step Eight - Assembling the Snowflake

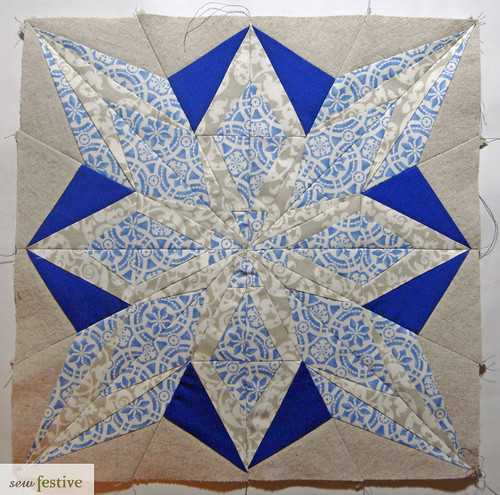
Sew block A to block B. Press seam open. Sew block C to block D. Press seam open. Sew top section to bottom section. Press seam open.


Awesome! You have a paper pieced snowflake block! You can stop here and use the block for whatever purpose, or you can read on to see how to make it into a table runner/wall hanging!

Step Nine - Assembling the Top


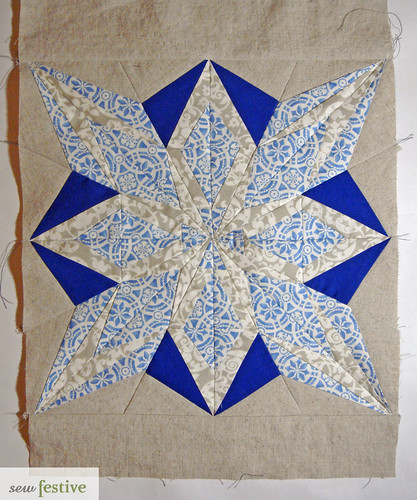
Cut two strips from background fabric that are 2.5"x12.5". Sew them to the top and bottom of the snowflake block. Press seams away from the snowflake.

Cut two pieces of background fabric that are 15"x16". Sew them to the left and right side of the snowflake block. You will be sewing along the 16" side. Press seams away from the snowflake.

Mark the left side at the 8" mark. Fold each side in to that mark so that the corners make right angles. Trim along the folded line [Save those triangles for another project!]. Repeat the same process on the right side.

Step Ten - Embellish

Baste top to batting, using preferred method. Trim batting to size of top.
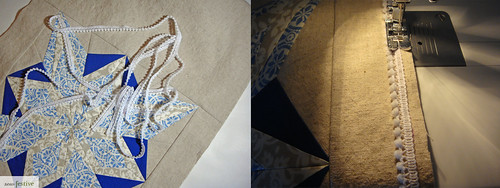
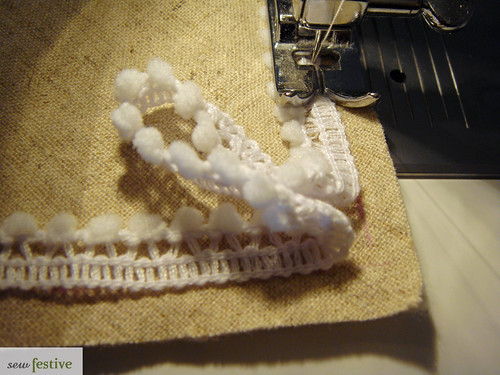
I chose to add tiny pom poms around the edge of my runner/wall hanging. I wasn't planning on it originally, but they were right next to me as I was sewing, and they're like tiny snowballs, right? If you don't want a trim then you can just skip these instructions!


Place your trim 1/4" from the edge of the top, with the pom poms facing in. Sew around the edge at just a hair past 1/4" so that you're catching just enough of the trim to secure it for the next step. Overlap the trim slightly when you get back to your starting point. There is NO backing on your project at this step, just the top and the batting.


To make a hanging loop, when you get to the point that will be the top, simply pull a little extra trim in towards the center and then continue following the edge. Backstitch a few times to give extra stability to the hanging loop.


*Note: Apparently these things melt under a really hot iron [ask me how I know], so take that into consideration.

Step Eleven - Assemble

Trim backing to exact size of top.

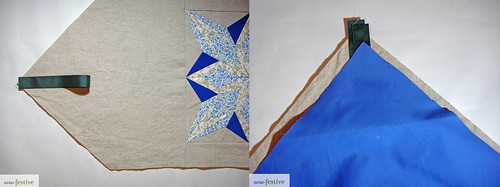
If you did not add a trim - Put ribbon ends at the end of your runner/wall hanging that you want to be the top. The ribbon should be facing in towards the center, with the ends sticking over the edge by at least 1/2". Secure with pins if necessary. 

Lay backing right sides together with top. Your project should be layered as follows: backing, top, batting. Smooth the fabric out as much as possible [you want to prevent bubbles when you turn it] and pin! Stitch around the runner at just over a 1/4" seam allowance, leaving a few inches open to turn right-side-out. Backstitch several times over the ribbon ends for extra security.

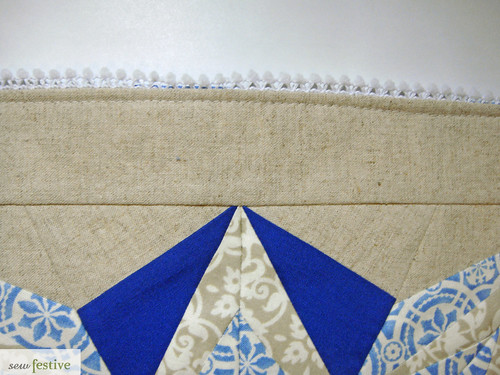
Turn runner right-side-out, pressing out the top and bottom points. Press unstitched edges. Make sure there are no bubbles and top-stitch around the edges at 1/8".

Step Twelve - Quilt as Desired

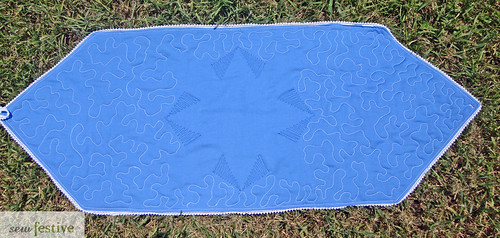
I opted for a large stipple in the negative space and some free-motion straight-ish lines in the solid blue, but you don't have to add quilting if you don't want to, especially if this is destined to hang on the wall.

Step Thirteen - Enjoy!


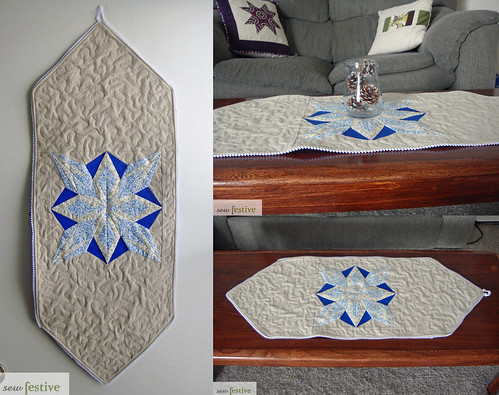
You did it! You have yourself a paper pieced snowflake table runner or wall hanging. The ribbon can just be tucked under if you'd like to use it on a table, and hung over a peg/tack/etc for hanging on the wall! Mine looks particularly smashing on my coffee table that I refinished myself ;)

I plan to hopefully add the words "I'm dreaming of a white Christmas" to my project if I find a stamp set that I like!

Phew! If you've made it this far, congrats! I hope that the instructions and photos are clear, and that you consider making one of these for yourself!

What? Not feeling the snowflake?


Look! You can make a poinsettia out of the same pattern! This is next on my list!

Please let me know if you have any questions! And what you think of the pattern. If you make something using the pattern, I'd love for you to email me a picture :)

Merry Christmas in July Day 1! Come back next Monday for more holiday tutorials! And remember, at the end of the month is a link-up where you can show your completed holiday prizes and get a chance at some prizes!